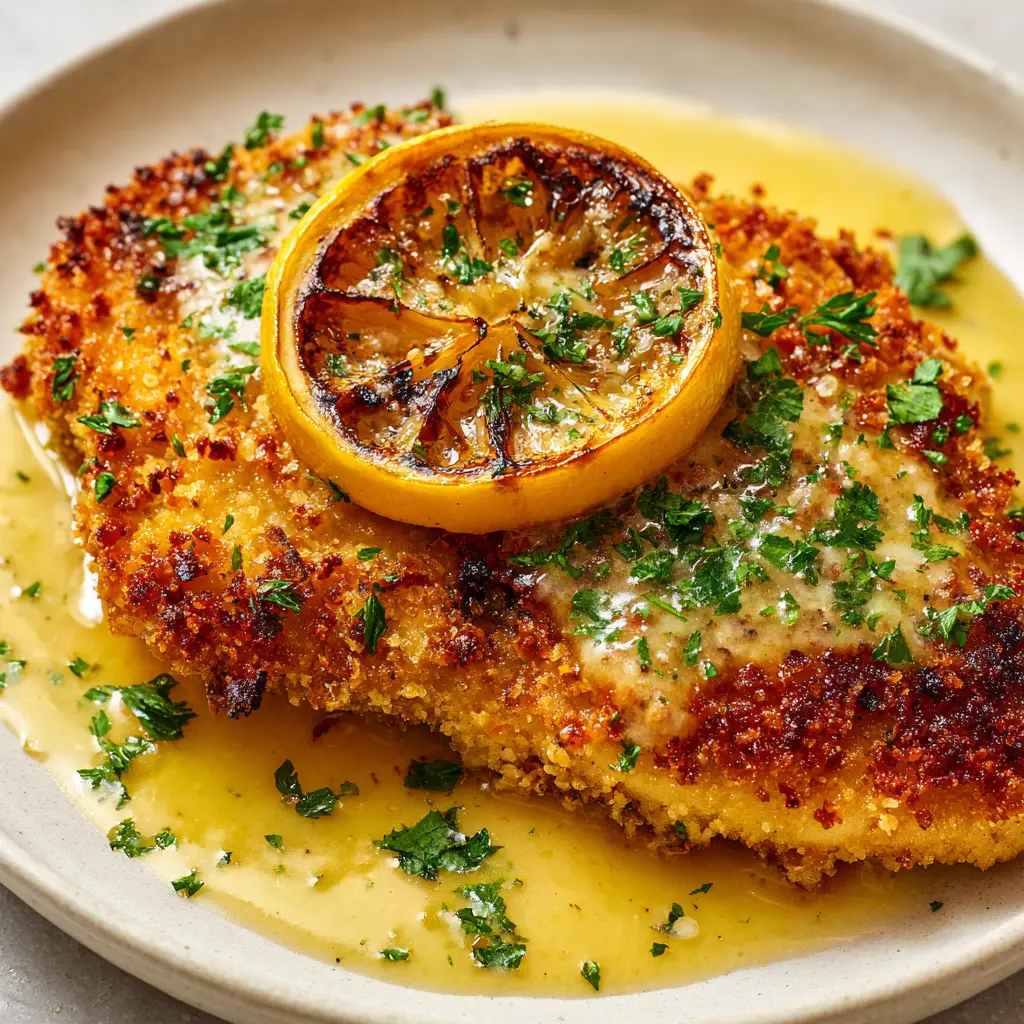
Prepare yourself for a truly transformative chicken dinner. This Lemon Chicken Romano recipe is not just another weeknight meal; it’s an experience in texture and taste. Imagine a perfectly pan-fried chicken breast, encased in a shatteringly crisp, golden-brown crust of savory Romano cheese and panko breadcrumbs. Then, picture it generously drizzled with a glossy, vibrant lemon butter sauce that glistens under the light. This is restaurant-quality elegance made astonishingly simple in your own kitchen.
Every element, from the freshly chopped parsley garnish to the artfully charred lemon slice resting on top, is designed to deliver a symphony of flavor. The sharp, salty notes of the Romano cheese cut through the richness of the butter, all brightened by the zesty punch of fresh lemon. It’s a dish that looks as incredible as it tastes, precisely like a cherished, unedited photo captured on a bright, sunny afternoon.
Why This Lemon Chicken Romano Will Become Your New Favorite
This isn’t just a recipe; it’s a blueprint for perfection. Here’s what makes this particular version of Lemon Chicken Romano stand out:
- Shatteringly Crispy Golden Crust: We use a specific combination of Romano cheese and panko breadcrumbs to create an unbelievably crunchy crust that stays crisp, even when smothered in sauce.
- Glossy & Translucent Lemon Butter Sauce: Learn the technique to create a velvety, emulsified pan sauce that’s bursting with bright, tangy lemon flavor without being heavy or greasy.
- Perfectly Juicy Chicken: By butterflying and pounding the chicken breasts, we ensure they cook quickly and evenly, remaining tender and moist inside their crispy coating.
- Visually Stunning Garnish: The simple additions of a charred lemon slice and fresh parsley elevate the dish, adding a smoky aroma and a fresh, herbaceous finish that balances the richness.
The Anatomy of a Perfect Golden Crust & Silky Sauce
The magic of this dish lies in using the right ingredients for their specific purpose. Each one plays a critical role in achieving that picture-perfect result.
For the Crispy Chicken
- Chicken Breasts: Two large (about 8 oz / 225g each), boneless, skinless chicken breasts are the canvas. We’ll butterfly and pound them thin for quick, even cooking that guarantees a juicy result.
- All-Purpose Flour: This is the crucial first layer in our breading station. It gives the egg wash something to cling to, ensuring the crust adheres perfectly.
- Large Eggs: The binder that holds our delicious crust to the chicken. A simple egg wash is all it takes.
- Panko Breadcrumbs: For superior crunch! Panko breadcrumbs are lighter and flakier than traditional breadcrumbs, creating a far crispier texture.
- Pecorino Romano Cheese: The star of the crust. Freshly grated is non-negotiable here; its sharp, salty flavor is what makes this dish “Romano.” It also browns beautifully in the pan. If you’re looking for a similar cheesy chicken dish, our Longhorn Parmesan Chicken is another fan favorite.
- Salt & Black Pepper: Essential for seasoning every layer, from the chicken itself to the flour and breadcrumb mixtures.
For the Glossy Lemon Butter Sauce
- Unsalted Butter: We use cold, cubed unsalted butter. Using it cold and adding it at the end helps create a stable, glossy emulsion for that perfect sheen.
- Olive Oil: A splash of olive oil mixed with butter for pan-frying prevents the butter from burning while still providing that rich flavor.
- Low-Sodium Chicken Broth: This creates the body of the sauce, deglazing the pan to lift all those flavorful browned bits (the “fond”) left after cooking the chicken.
- Fresh Lemon: We use both the juice and a slice for charring. The juice provides the bright, acidic backbone of the sauce, while the charred slice adds a smoky, complex aroma.
- Fresh Parsley: Finely chopped for a burst of fresh, green flavor and color that cuts through the richness of the sauce.
Essential Tools for Flawless Execution
You don’t need a professional kitchen, just a few key tools to make this Lemon Chicken Romano perfectly.
- Large Skillet: A 12-inch (30cm) skillet, preferably stainless steel or cast iron, is ideal for getting a great sear and for building the pan sauce.
- Shallow Dishes: You’ll need three for the dredging station (flour, eggs, breadcrumb mixture). Pie plates or rimmed dinner plates work well.
- Meat Mallet or Rolling Pin: For pounding the chicken breasts to an even thickness.
- Tongs: For easily flipping the chicken without piercing the crust.

Bringing Your Lemon Chicken Romano to Life, Step-by-Step
Follow these steps closely, paying attention to the sensory cues, to recreate the dish exactly as you see it.
Step 1: Prepare the Chicken Cutlets
First, place a chicken breast on a cutting board. Holding your knife parallel to the board, carefully slice through the middle of the breast to butterfly it. Open it up and slice all the way through to create two thin cutlets. Repeat with the second breast.
Place the cutlets inside a plastic bag or between two pieces of parchment paper. Using the flat side of a meat mallet, gently pound them to an even 1/4-inch (6mm) thickness. This is key for a quick cook and juicy interior. Season both sides of each cutlet generously with salt and pepper.
Step 2: Assemble the Breading Station
Set up your three shallow dishes. In the first, place 1/2 cup (60g) of all-purpose flour seasoned with 1/2 tsp each of salt and pepper. In the second, whisk 2 large eggs until smooth. In the third, combine 1 cup (100g) of panko breadcrumbs and 1/2 cup (50g) of finely grated Pecorino Romano cheese.
Working with one cutlet at a time, dredge it in the flour, shaking off any excess. Next, dip it into the egg wash, allowing the excess to drip off. Finally, press it firmly into the Romano-breadcrumb mixture, ensuring it’s completely and evenly coated.
Step 3: Pan-Frying to Golden Perfection
In your large skillet, heat 2 tbsp (30ml) of olive oil and 2 tbsp (28g) of butter over medium-high heat. You’ll know the pan is ready when the butter is melted and foaming, and the oil shimmers slightly.
Carefully place two breaded cutlets in the skillet. Do not overcrowd the pan. Listen for a confident sizzle. Cook for 3-4 minutes per side, until the crust is a deep, crispy golden-brown and the chicken is cooked through. Transfer the cooked chicken to a wire rack to keep the bottom crispy. Repeat with the remaining two cutlets, adding more oil or butter if needed.
Step 4: Crafting the Glossy Lemon Butter Pan Sauce
Reduce the heat to medium. Add one thin lemon slice to the pan and cook for about 45 seconds per side, until lightly charred and fragrant. Remove from the pan and set aside.
Pour in 1/2 cup (120ml) of chicken broth to deglaze, scraping up any browned bits from the bottom of the pan with a wooden spoon. Let it simmer and reduce by about half. Stir in the juice of one lemon (about 3 tbsp / 45ml).
Remove the pan from the heat. Add 4 tbsp (56g) of cold, cubed butter, one piece at a time, whisking constantly until the sauce is smooth, glossy, and slightly thickened. Stir in 2 tbsp (8g) of freshly chopped parsley. Taste and adjust seasoning if necessary.
To serve, place a crispy chicken cutlet on a plate. Spoon the glossy lemon butter sauce generously over the top. Garnish with the charred lemon slice and an extra sprinkle of chopped parsley.
Expert Tips for a Flawless Finish
Keep these professional tips in mind to nail your Lemon Chicken Romano every time.
- Don’t Skip Pounding the Chicken: This is the most important step for ensuring your chicken is tender and cooks in the same amount of time it takes to crisp the crust.
- Use Freshly Grated Romano: Pre-shredded cheeses contain anti-caking agents that prevent them from melting and browning properly. Grate your own for the best flavor and texture.
- Maintain Proper Oil Temperature: If the oil isn’t hot enough, the crust will absorb it and become greasy. If it’s too hot, the crust will burn before the chicken is cooked. Look for that gentle, consistent sizzle.
- Use Cold Butter for the Sauce: Adding cold butter to the pan off the heat and whisking vigorously is the secret to creating a stable emulsion, resulting in that beautiful, glossy sheen. It’s a classic French technique called monter au beurre.
Storing, Reheating, and Freezing Your Chicken
While Lemon Chicken Romano is best enjoyed immediately, leftovers can still be delicious. Store cooled chicken in an airtight container in the refrigerator for up to 3 days. For best results, reheat in an oven or air fryer at 375°F (190°C) for 10-15 minutes, until the crust is crisp and the chicken is heated through. The sauce can be gently reheated in a saucepan over low heat.
We don’t recommend freezing the cooked dish, as the crust will lose its signature crispiness upon thawing.
Spectacular Sides and Pairings
This Lemon Chicken Romano pairs beautifully with a variety of sides. For a classic Italian-American meal, serve it over a bed of angel hair pasta or with a side of creamy risotto. It’s also fantastic with simple roasted vegetables, like our Crispy Roasted Cauliflower. For a lighter option, a simple arugula salad with a lemon vinaigrette is perfect. If you enjoy this flavor profile, you might also love its cousin, Lemon Butter Chicken Francese, which features a light, egg-battered coating.
Your Questions, Answered
Here are answers to some common questions about making this dish.
Absolutely. Parmesan is a great substitute. It has a slightly milder, nuttier flavor compared to the sharp saltiness of Pecorino Romano, but it will still create a delicious, crispy crust.
There are three keys to a crispy crust: 1) Make sure your oil is hot enough before adding the chicken, 2) Don’t overcrowd the pan, which lowers the oil temperature, and 3) Rest the cooked chicken on a wire rack, not a plate, to allow air to circulate underneath.
They are similar but distinct. Chicken Francese has a lighter egg-based dredge (no breadcrumbs). Chicken Piccata typically has a simple flour dredge and includes capers in its lemon butter sauce. Chicken Romano’s signature is its crispy cheese-and-breadcrumb crust.
If your sauce is too thin, you can let it simmer for a few more minutes to reduce further. Be sure you are whisking in cold butter off the heat, as this helps it emulsify and thicken. In a pinch, a tiny slurry of cornstarch and water can be whisked in, but the reduction method is preferred for flavor.
If you don’t have a meat mallet, a heavy rolling pin or even the bottom of a sturdy saucepan will work perfectly. Just be sure to place the chicken between two sheets of parchment paper or in a zip-top bag to prevent tearing.
Your Perfect Lemon Chicken Romano Recipe Awaits
Now you have all the secrets to creating a stunningly delicious and visually impressive Lemon Chicken Romano. Get ready to watch this become a most-requested favorite!

Lemon Chicken Romano: The Ultimate Crispy & Zesty Recipe
Equipment
- 1 Large skillet 12-inch stainless steel or cast iron recommended.
- 3 Shallow Dishes For the breading station.
- 1 Meat Mallet
Ingredients
- 2 large boneless, skinless chicken breasts about 8 oz / 225g each, butterflied and pounded to 1/4-inch thickness
- 1/2 cup all-purpose flour 60g
- 2 large eggs whisked
- 1 cup panko breadcrumbs 100g
- 1/2 cup Pecorino Romano cheese 50g, freshly and finely grated
- 1 tsp salt divided
- 1/2 tsp black pepper freshly ground, divided
- 2 tbsp olive oil 30ml
- 6 tbsp unsalted butter 84g, divided and cold
- 1/2 cup low-sodium chicken broth 120ml
- 1 large lemon juiced, plus one slice for charring
- 2 tbsp fresh parsley 8g, finely chopped, plus more for garnish
Instructions
- Butterfly the chicken breasts and pound each cutlet to an even 1/4-inch (6mm) thickness. Season both sides generously with salt and pepper.
- In three separate shallow dishes, place: 1) flour seasoned with 1/2 tsp each salt and pepper; 2) whisked eggs; 3) panko breadcrumbs mixed with the grated Romano cheese.
- Dredge each cutlet first in flour, then egg, and finally press firmly into the panko-Romano mixture to coat completely.
- In a large skillet over medium-high heat, heat 2 tbsp olive oil and 2 tbsp butter. Once shimmering, cook two cutlets for 3-4 minutes per side, until golden brown and crispy. Transfer to a wire rack and repeat with the remaining chicken.
- Reduce heat to medium. Add the lemon slice and char for 45 seconds per side; remove. Deglaze the pan with chicken broth, scraping up any browned bits. Simmer until reduced by half.
- Stir in the lemon juice. Remove the pan from the heat and whisk in the remaining 4 tbsp of cold butter, one piece at a time, until the sauce is glossy and emulsified. Stir in the chopped parsley.
- Place chicken on a plate, spoon over the lemon butter sauce, and garnish with the charred lemon slice and more fresh parsley.
Notes
Use Freshly Grated Romano: Pre-shredded cheeses contain anti-caking agents that prevent them from melting and browning properly.
Maintain Proper Oil Temperature: If the oil isn't hot enough, the crust will absorb it and become greasy. If it's too hot, it will burn before the chicken is cooked.
Use Cold Butter for the Sauce: Adding cold butter to the pan off the heat is the secret to creating a stable emulsion for a glossy sheen.
Share Your Creations!
We can’t wait to see your results! If you make this Lemon Chicken Romano, please leave a comment below and let us know how it turned out. Don’t forget to save this recipe to your favorite board on Pinterest!