There is a specific kind of culinary magic that happens when you combine a dense, dark chocolate brownie with the silky, tangy crumb of a baked vanilla cheesecake. These Brownie Bottom Mini Cheesecakes are not just another dessert; they are a masterclass in contrasting textures and deep, cocoa-forward flavors.
Imagine sinking your fork through a layer of glossy, melted dark chocolate ganache, passing through a cloud-like vanilla center, and finally hitting a fudgy, flourless-style brownie foundation. This recipe was designed to replicate the high-end look of a professional patisserie while remaining perfectly achievable for the enthusiastic home baker.
By focusing on high-quality fats and precise baking temperatures, we ensure that every single mini cheesecake is a structural marvel. Whether you are hosting a dinner party or simply satisfying a midnight cocoa craving, these bite-sized wonders are the definitive answer to “what’s for dessert?”
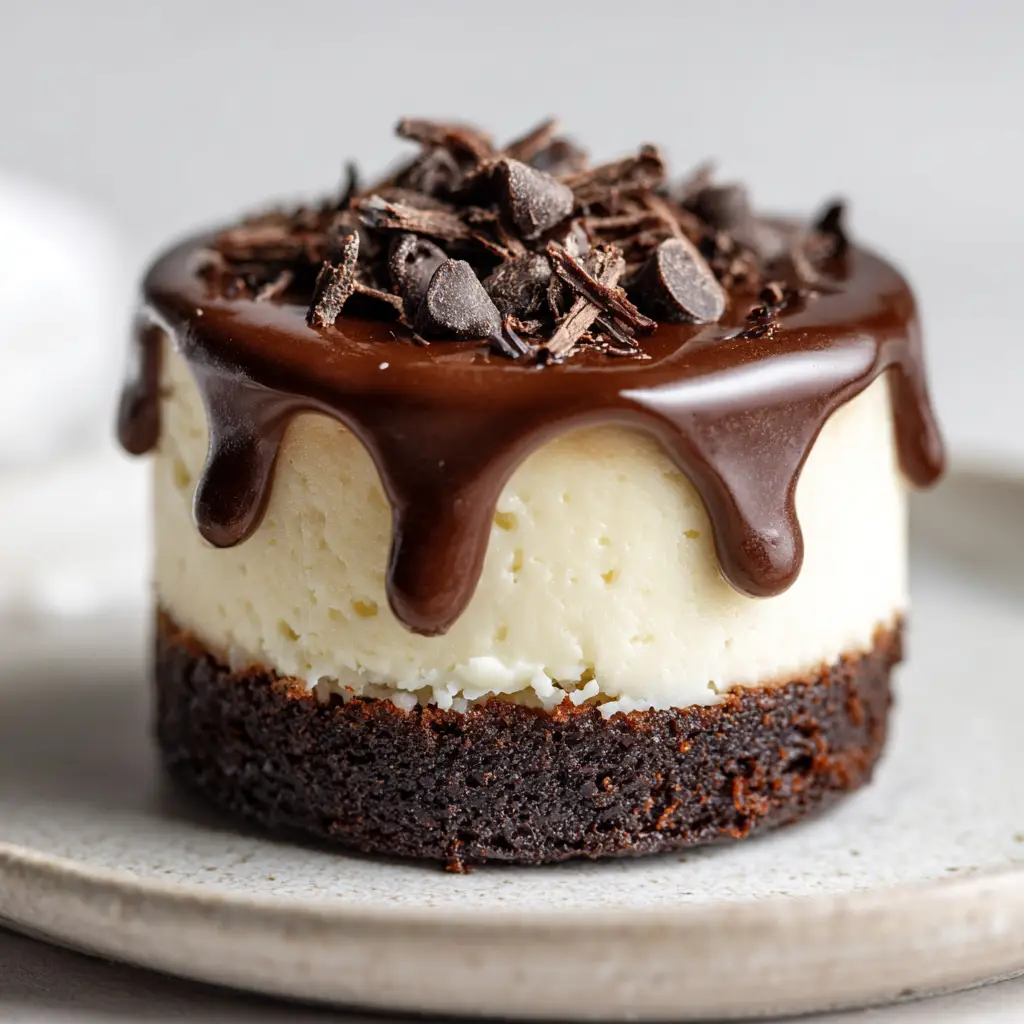
The Anatomy of a Perfect Mini Layered Dessert
- The Fudgy Foundation: A dense, dark chocolate base that provides a sturdy yet moist anchor for the creamy layers above.
- The Velvet Middle: A smooth, baked vanilla cheesecake layer that balances the richness of the chocolate with its light, tangy profile.
- The Glossy Finish: A luxurious dark chocolate ganache that provides that signature “drip” look and a professional sheen.
- Textural Contrast: Finely grated dark chocolate curls and mini chocolate chips provide a final snap of cocoa in every bite.
Essential Components for Your Brownie Bottom Mini Cheesecakes
The Elements of the Fudgy Brownie Base
Unsalted Butter (1/2 cup / 115g): We melt this slowly to ensure the milk solids emulsify perfectly with the sugar, creating that classic shiny brownie top. Using high-quality European-style butter adds a deeper richness to the base.
Granulated Sugar (1 cup / 200g): Sugar does more than sweeten; it dissolves into the fat to create the structural “chew” required for a dense brownie foundation. It also helps in achieving the dark, crinkly texture we desire.
Dutch-Process Cocoa Powder (1/2 cup / 45g): This specific cocoa is treated with alkali, giving it a darker color and a smoother, less acidic flavor than natural cocoa. This is the secret to the “dark brown” visual requested in the recipe blueprint.
All-Purpose Flour (1/2 cup / 65g): Just enough flour is used to provide structure without making the base cakey. We want a dense, fudgy result that feels like a truffle.
The Secrets to the Creamy Cheesecake Center
Full-Fat Cream Cheese (8 oz / 225g): It is imperative that this is at true room temperature to avoid lumps. This provides the “smooth, creamy off-white” color and the iconic tangy cheesecake flavor.
Sour Cream (1/4 cup / 60g): Adding sour cream softens the protein structure of the cream cheese. This results in a more delicate, melt-in-your-mouth texture that contrasts beautifully with the dense brownie.
Pure Vanilla Bean Paste (1 tsp / 5ml): While extract works, paste provides those beautiful tiny black flecks. This reinforces the “vanilla” identity of the middle layer visually and aromatically.
The Decadent Ganache and Garnishes
Dark Chocolate Chips (1/2 cup / 90g): Choose a cacao percentage between 60% and 70% for the best flavor balance. This ensures the topping isn’t cloyingly sweet and maintains its “glossy” appearance.
Heavy Whipping Cream (1/3 cup / 80ml): When heated and poured over chocolate, it creates a stable emulsion. This allows the ganache to drip slightly over the edges while remaining thick enough to set.
Grated Chocolate Curls & Mini Chips: These are the “forensic” details that elevate the dish. Use a vegetable peeler on a block of room-temperature chocolate to get those elegant, fine curls.
Necessary Tools for Patisserie-Quality Results
To achieve the precise layers seen in our visual guide, a standard 12-cup muffin tin is essential. Using high-quality paper liners or a silicone pan will ensure the edges of your Brownie Bottom Mini Cheesecakes remain smooth and unmarred during removal.
A fine-mesh sieve is helpful for sifting the cocoa powder, preventing any stubborn clumps in your fudgy base. Additionally, a small offset spatula is the professional’s secret for smoothing the cheesecake layer and guiding the ganache drip.
If you enjoy experimenting with layered textures, you might also find success using these tools for a coconut ricotta cake or even managing the delicate layers of a lemon custard cake.
Step-by-Step Construction of the Brownie Bottom Mini Cheesecakes
Phase 1: Preparing the Fudgy Brownie Foundation
Begin by preheating your oven to 350°F (175°C). In a medium microwave-safe bowl, melt your butter and whisk in the sugar until the mixture looks like wet sand. Whisk in one large egg and a splash of vanilla until the batter becomes glossy and pulls away from the sides of the bowl.
Sift in your cocoa powder, flour, and a pinch of salt. Fold gently with a spatula until no streaks of white remain. Divide this thick, dark batter evenly among 12 lined muffin cups, pressing it down slightly to form a flat base.
Bake the brownie layer for just 8-10 minutes. We are looking for the edges to be set, but the center should still be slightly underbaked. This “par-baking” ensures the brownie remains fudgy after the second trip to the oven with the cheesecake.

Phase 2: Crafting the Silky Vanilla Cheesecake Layer
While the brownie bases cool slightly, beat your room-temperature cream cheese and sugar on medium speed until completely smooth. Add the sour cream, vanilla paste, and one egg. Mix on low speed just until combined—incorporating too much air will cause the cheesecakes to puff up and then crack.
Spoon the white cheesecake mixture over the par-baked brownie bases. Fill each cup nearly to the top, as these mini cheesecakes do not rise significantly. The contrast between the dark base and the off-white top should be clearly visible.
Lower the oven temperature to 325°F (160°C) and bake for 15-18 minutes. Look for the “visual cue”: the edges should be set and slightly matte, but the very center should still have a slight, uniform jiggle when the pan is tapped.
Phase 3: The Cooling and Setting Process
Patience is the most important ingredient here. Allow the cheesecakes to cool in the pan for 30 minutes, then transfer them to the refrigerator for at least 3 hours. This cold environment is what transforms the texture from a soft mousse to a dense, creamy cheesecake.
If you skip this step, the layers will bleed into each other when you apply the warm ganache. Much like preparing make-ahead egg muffins, the chilling time is structural, not just for temperature.
Phase 4: Glazing and Garnishing for Visual Impact
To create the glossy ganache, heat your heavy cream until it just begins to simmer. Pour it over your dark chocolate chips and let it sit for 2 minutes undisturbed. Gently whisk from the center outward until a shiny, dark emulsion forms.
Spoon about a tablespoon of ganache onto each chilled cheesecake. Use the back of the spoon to push the chocolate toward the edges, allowing it to drip slightly over the sides. Immediately top with your finely grated chocolate curls and a few mini chocolate chips so they adhere to the wet ganache.
Expert Tips for Success
- The Temperature Rule: Always use room temperature eggs and cream cheese. Cold ingredients lead to over-mixing, which introduces air and causes unsightly cracks.
- The Tap Method: After filling your muffin tin with the cheesecake batter, tap the pan firmly on the counter 3-4 times. This releases trapped air bubbles that could ruin the “smooth” visual finish.
- The Clean Cut: If you are serving these without liners, dip a thin knife in hot water and wipe it dry between every single cut to maintain those sharp, distinct layers.
- Ganache Consistency: If your ganache is too thin, let it sit for 5 minutes to thicken. If it’s too thick to drip, microwave it for exactly 5 seconds.
Storing and Freezing Your Mini Masterpieces
These Brownie Bottom Mini Cheesecakes thrive in the cold. Store them in an airtight container in the refrigerator for up to 5 days. The brownie layer actually becomes fudgier after a day of resting, making these an excellent make-ahead dessert.
To freeze, place the fully set and garnished cheesecakes on a baking sheet until frozen solid, then wrap individually in plastic wrap. They will stay fresh for up to 3 months. Thaw in the refrigerator for 2 hours before serving for the best texture.
What to Serve With These Decadent Bites
Because these cheesecakes are intensely rich, they pair beautifully with a cup of strong espresso or a glass of cold milk. If you are creating a full dessert spread, consider adding something fruity like a chocolate coconut cake or items with a salty-sweet profile to balance the palate.
For those looking for a complete “dinner and a show” experience, these make a fantastic follow-up to a savory meal like Texas Roadhouse smothered chicken or even a light creamy garlic chicken ramen.
Frequently Asked Questions
Yes, you can use a boxed mix. However, reduce the yield by half or bake the remaining batter separately, as you only need a small amount for the 12 mini bases.
Unlike full-sized cheesecakes, mini versions do not require a water bath. The small surface area allows them to bake evenly without cracking as long as you don’t overbake them.
The key is temperature. Let the ganache cool for about 5-10 minutes until it reaches a slightly thickened, honey-like consistency before spooning it over the chilled cheesecakes.
For the best texture and clean layers, they should be refrigerated for at least 3-4 hours, though overnight is ideal for the brownie base to reach peak fudginess.
This usually happens when too much air is whipped into the batter. To prevent this, mix on low speed once the eggs are added and tap the pan on the counter to release air bubbles before baking.
Brownie Bottom Mini Cheesecakes Recipe

Brownie Bottom Mini Cheesecakes: The Ultimate Fudgy and Creamy Handheld Treat
Equipment
- 1 12-cup muffin tin Standard size
- 12 Paper liners To prevent sticking
- 1 Whisk For brownie batter and ganache
Ingredients
Brownie Foundation
- 1/2 cup unsalted butter melted (115g)
- 1 cup granulated sugar (200g)
- 1/2 cup Dutch-process cocoa powder (45g)
- 1/2 cup all-purpose flour (65g)
- 1 large egg room temperature
Vanilla Cheesecake Layer
- 8 oz cream cheese full-fat, softened (225g)
- 1/4 cup granulated sugar (50g)
- 1/4 cup sour cream (60g)
- 1 tsp vanilla bean paste or extract (5ml)
- 1 large egg room temperature
Ganache and Garnish
- 1/2 cup dark chocolate chips 60% cacao or higher (90g)
- 1/3 cup heavy whipping cream (80ml)
- 2 tbsp chocolate curls and mini chips for garnish
Instructions
Prepare the Brownie Base
- Whisk melted butter and sugar. Add the egg and vanilla, whisking until glossy. Fold in cocoa powder, flour, and salt until just combined.
- Divide batter into 12 lined muffin cups. Bake at 350°F (175°C) for 8-10 minutes. Remove and lower oven to 325°F (160°C).
Prepare the Cheesecake Layer
- Beat softened cream cheese and sugar until smooth. Add sour cream, vanilla, and egg, mixing on low speed until combined.
- Spoon cheesecake mixture over the brownie bases. Bake for 15-18 minutes until edges are set but the center still jiggles slightly.
Assembly
- Cool in the pan for 30 minutes, then refrigerate for at least 3 hours to set the layers.
- Pour hot cream over chocolate chips to make ganache. Spoon over chilled cheesecakes, allowing a slight drip. Garnish with curls and mini chips.
Notes
Use a vegetable peeler on a block of dark chocolate to create the fine curls for a professional look.
Join the Spiced Bites Community!
These Brownie Bottom Mini Cheesecakes are a testament to the fact that you don’t need a professional kitchen to produce stunning, multi-layered desserts. The combination of the fudgy base and the dripping ganache makes for a truly “Instagrammable” result that tastes even better than it looks.
If you enjoyed this recipe, please leave a comment below and tell us how yours turned out! Don’t forget to follow us on Pinterest for more culinary inspiration and share your photos with the Spiced Bites community. Happy baking!
Looking for more unique cheesecake ideas? Check out our cinnamon roll cheesecake chimichangas for a fried twist on the classic!


