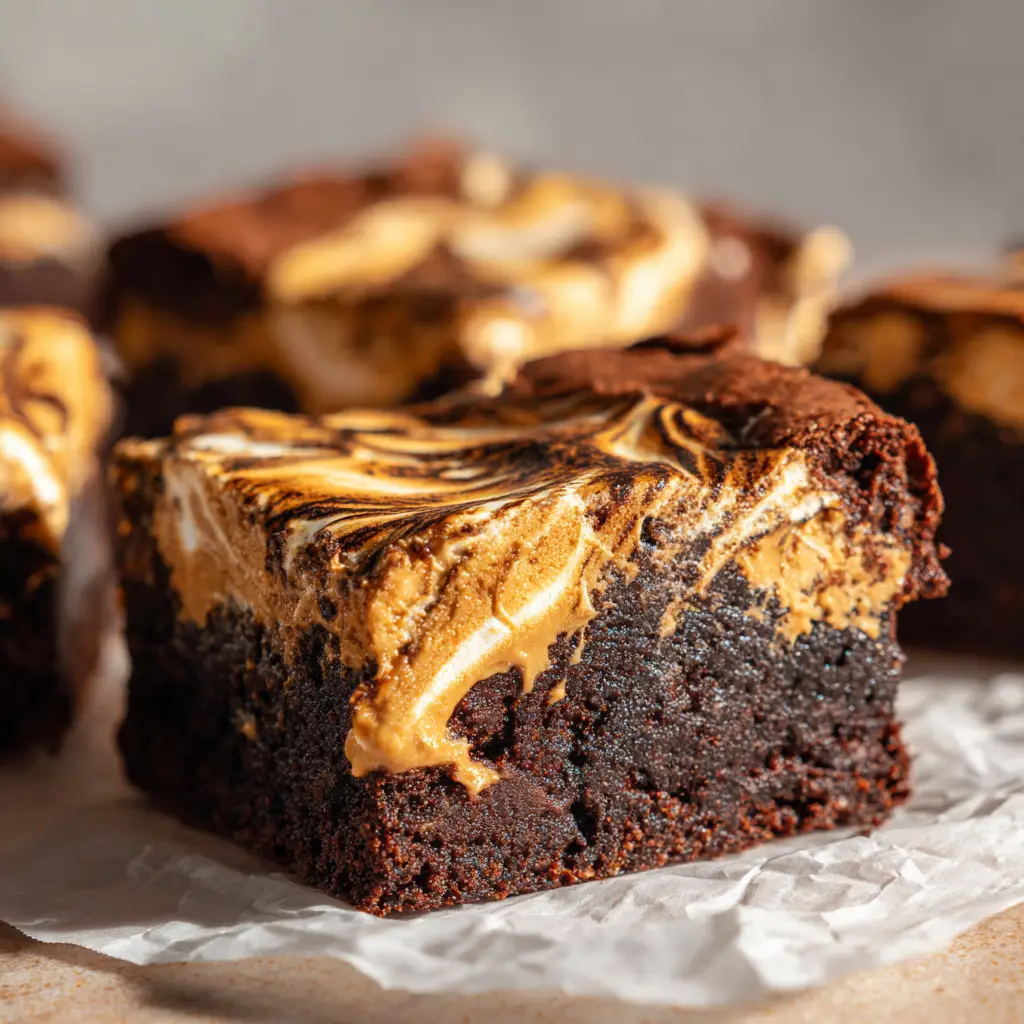
There is nothing quite like pulling a fresh, bubbling pan of Fluffernutter Brownies out of the oven. If you have ever dreamed of a dessert that perfectly marries a dense dark chocolate brownie base with thick toasted marshmallow fluff swirls, your culinary search ends right here. This recipe delivers incredibly thick, fudgy squares resting perfectly on crinkled white parchment paper, just begging to be devoured.
What makes these brownies truly spectacular is the interplay of textures on the top surface. You will find golden-brown toasted marshmallow fluff swirled intricately with smooth, creamy, warm tan peanut butter. As you bite through the slightly crackly and baked brownie edges, the center reveals a beautifully moist, gooey chocolate crumb that melts in your mouth.
Why You Will Obsess Over These Fudgy Peanut Butter Marshmallow Squares
- Unmatched Textural Contrast: The crackly baked brownie edges perfectly complement the ultra-gooey, dense dark chocolate center.
- Caramelized Complexity: The melted marshmallow develops a slight caramelized char in spots, adding a sophisticated campfire flavor.
- Visual Perfection: The intricate swirling technique creates a photorealistic masterpiece that looks as decadent as it tastes.
- Symphony of Flavors: The bittersweet dark chocolate balances flawlessly with the savory peanut butter and sweet, sticky marshmallow.
Essential Components for the Perfect Gooey Chocolate Crumb
Dark Chocolate Chips: You will need 1 cup (170g) of high-quality dark chocolate chips. Half is melted into the batter for pure fudginess, while the rest provides intensely rich, gooey pockets in the center.
Unsalted Butter: Using 1/2 cup (113g) of unsalted butter creates a rich, tender crumb. Melting the butter alongside the chocolate ensures a supremely dense texture rather than a cakey one.
Granulated & Brown Sugar: A blend of 3/4 cup (150g) granulated sugar and 1/2 cup (100g) packed light brown sugar is non-negotiable. The granulated sugar promotes the crackly crust, while the brown sugar adds essential moisture.
Large Eggs: You will need 3 large eggs at room temperature. Vigorously whisking the eggs with the sugar incorporates air, creating the iconic papery, crackly brownie surface during baking.
All-Purpose Flour & Cocoa Powder: A minimal 3/4 cup (95g) of all-purpose flour keeps the brownies fudgy, not heavy. Adding 1/4 cup (25g) of unsweetened cocoa powder deepens the dark chocolate profile.
Creamy Peanut Butter: Use 1/2 cup (120ml) of standard, smooth peanut butter for the swirls. Avoid natural peanut butters, as their separated oils can disrupt the delicate top crust.
Marshmallow Fluff: You will need 1 cup (240ml) of commercial marshmallow crème. Real marshmallows will melt away entirely, but the fluff maintains those thick, glorious swirls.
Required Tools for Achieving Crackly Brownie Edges
To recreate these photorealistic Fluffernutter Brownies, arm yourself with a sturdy 8×8-inch metal baking pan. Metal conducts heat evenly, ensuring the edges bake to that slightly crackly perfection.
You will also need crinkled white parchment paper to line the pan, allowing for a seamless release without tearing the fudgy bottom. Finally, a simple butter knife or wooden skewer is essential for dragging through the batter to create the warm tan peanut butter and marshmallow swirls.

Master the Art of Intricate Fluff and Peanut Butter Swirls
Building the Dense Dark Chocolate Foundation
Begin by preheating your oven to 350°F (175°C) and lining your 8×8-inch pan with parchment paper. In a microwave-safe bowl, melt the unsalted butter and half of the dark chocolate chips in 30-second intervals until completely smooth. Set this luxurious mixture aside to cool slightly, ensuring it does not scramble the eggs later.
In a large mixing bowl, aggressively whisk the eggs, granulated sugar, and brown sugar together for about two minutes. You are looking for a pale, frothy consistency—this aeration is the scientific secret to achieving crackly baked brownie edges.
Executing the Caramelized Marshmallow Spots
Gently fold the melted chocolate mixture and 1 tsp (5ml) of vanilla extract into the frothy eggs until just combined. Next, sift in the flour, cocoa powder, and 1/2 tsp (3g) of fine sea salt, folding delicately with a spatula to maintain a dense, moist chocolate crumb. Fold in the remaining chocolate chips and pour the thick batter into your prepared pan.
Warm the creamy peanut butter in the microwave for 15 seconds to loosen it up. Dollop alternating spoonfuls of the warmed peanut butter and the marshmallow fluff directly onto the raw brownie batter. Using a butter knife, drag through the dollops in sweeping figure-eight motions to create intricate swirls.
Bake for 35-40 minutes until a toothpick inserted into the center comes out with moist crumbs. For that signature slight caramelized char in spots, switch your oven to broil for exactly 60 seconds right at the end—watch closely so the marshmallow fluff turns golden-brown without burning!
Professional Bakery Secrets for Flawless Slicing
- Patience is Mandatory: Never cut these brownies straight out of the oven. The dense dark chocolate base needs at least two hours to set up properly on a rustic wooden countertop.
- The Hot Knife Trick: To achieve clean cuts through the sticky toasted marshmallow fluff, run a large chef’s knife under hot water, wipe it completely dry, and slice.
- Chill for Perfection: If you want razor-sharp squares that look like photorealistic food photography, pop the cooled pan into the fridge for 30 minutes before slicing.
- Do Not Overbake: Pull the brownies when the center still jiggles slightly. Carryover cooking will finish the job, guaranteeing a gooey chocolate crumb.
Preserving That Fresh-Baked Fudgy Texture
To keep your Fluffernutter Brownies incredibly soft and gooey, store them in an airtight container at room temperature for up to four days. Placing a slice of sandwich bread in the container will miraculously help the brownies retain their moisture.
If you want to prolong their shelf life, tightly wrap individual squares in plastic wrap and freeze them for up to three months. Simply let them thaw at room temperature for an hour, or warm them in the microwave for 15 seconds to restore that freshly-baked, melted marshmallow joy.
Decadent Dessert Pairings for Your Chocolate Feast
While these brownies are a showstopper on their own, serving them alongside other complementary desserts elevates your dessert table. If you love the peanut butter and marshmallow flavor profile, you have to try these incredible chocolate peanut butter marshmallow cookies for a handheld treat.
For an ultimate chocolate lover’s gathering, pair these fudgy squares with a slice of rich hot fudge sundae brownie cheesecake. If you prefer bite-sized indulgences to accompany the brownies, our brownie bottom mini cheesecakes offer the perfect creamy contrast to the sticky fluff.
Troubleshooting Common Baking Inquiries
Absolutely! In fact, these brownies taste even better the next day after the flavors meld and the gooey chocolate crumb has fully set. Store them in an airtight container at room temperature.
It is highly recommended to use commercial marshmallow fluff or crème. Regular marshmallows tend to completely melt and disappear into the batter during baking, whereas fluff maintains its thick, swirly texture and caramelizes beautifully.
Patience is key. Let the brownies cool entirely, then chill them in the refrigerator for 30 minutes. Run a large, sharp chef’s knife under hot water, wipe it completely dry with a towel, and make your cuts, wiping the blade between each slice.
Vigorously whisking your room-temperature eggs and sugar together until pale and frothy incorporates air. This, combined with melting the butter and chocolate together, creates the iconic crackly, papery crust on top of the brownies.
This usually happens if your brownie batter is too thin or warm. Ensuring a dense batter by not over-mixing the flour, and lightly warming the peanut butter so it glides smoothly across the top, helps keep the swirls anchored on the surface.
The Official Fluffernutter Brownies Formula
Ultimate Decadent Fluffernutter Brownies
Equipment
- 1 8x8-inch metal baking pan Metal conducts heat evenly for crackly edges.
- 1 Parchment paper Essential for easy removal of sticky brownies.
Ingredients
Brownie Batter & Swirls
- 1 cup dark chocolate chips 170g, divided use
- 1/2 cup unsalted butter 113g
- 3/4 cup granulated sugar 150g
- 1/2 cup light brown sugar 100g, packed
- 3 large eggs Room temperature
- 1 tsp vanilla extract 5ml
- 3/4 cup all-purpose flour 95g
- 1/4 cup unsweetened cocoa powder 25g
- 1/2 tsp fine sea salt 3g
- 1/2 cup creamy peanut butter 120ml, do not use natural peanut butter
- 1 cup marshmallow fluff 240ml, commercial marshmallow crème
Instructions
Making the Fluffernutter Brownies
- Preheat your oven to 350°F (175°C). Line an 8x8-inch metal baking pan with crinkled parchment paper, leaving an overhang on the sides for easy removal.
- In a microwave-safe bowl, combine the unsalted butter and half of the dark chocolate chips (1/2 cup). Microwave in 30-second intervals, stirring in between, until completely smooth. Let cool slightly.
- In a large mixing bowl, vigorously whisk the eggs, granulated sugar, and light brown sugar together for about 2 minutes until pale and frothy.
- Gently fold the slightly cooled melted chocolate mixture and vanilla extract into the frothy eggs. Sift in the all-purpose flour, cocoa powder, and fine sea salt. Fold gently until just combined, then stir in the remaining 1/2 cup of dark chocolate chips.
- Pour the dense batter into the prepared baking pan, smoothing the top. Warm the creamy peanut butter in the microwave for 15 seconds. Dollop alternating spoonfuls of the warmed peanut butter and marshmallow fluff over the batter. Use a butter knife to drag through the dollops in sweeping figure-eight motions.
- Bake for 35-40 minutes until the edges are crackly and a toothpick inserted into the center comes out with moist crumbs. For a caramelized char, switch the oven to broil for 60 seconds at the end, watching closely so the fluff turns golden-brown without burning.
- Allow the brownies to cool completely in the pan for at least 2 hours before using the parchment sling to lift them out. Slice with a hot, dry knife for clean cuts.
Notes
Tip 2: Use commercial marshmallow fluff (crème) rather than whole marshmallows, as whole marshmallows will dissolve entirely into the batter.
Join Our Community of Chocolate Lovers
If these thick, decadent Fluffernutter Brownies brought joy to your kitchen, we would love to hear about it! Leave a comment and a five-star rating below to let us know how your intricately swirled creation turned out.
Do not forget to snap a photo of your golden-brown marshmallow perfection before they disappear. Share your masterpiece and save this recipe for later by following us on Pinterest!


