If you have been scouring the internet for a healthy alternative to traditional bread, the Cottage Cheese Flatbread is the golden ticket you have been waiting for. This recipe isn’t just a fleeting social media trend; it is a culinary revelation that bridges the gap between high-protein nutrition and artisan, rustic satisfaction.
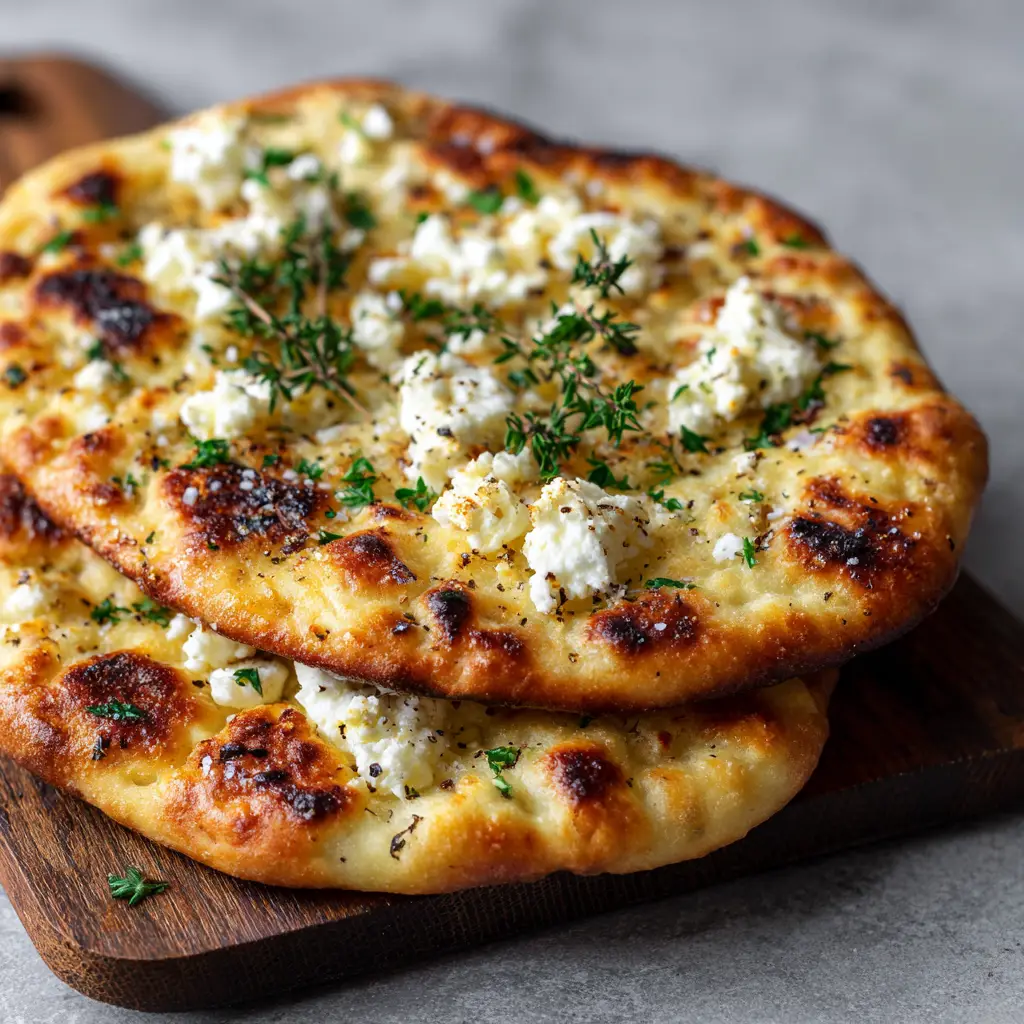
Imagine a stack of warm, golden-brown flatbreads with a soft, slightly chewy texture that rivals your favorite sourdough. These oval-shaped beauties are pan-seared to perfection, boasting prominent charred spots and a surface unevenly topped with dollops of melted white cottage cheese crumbles.
The visual appeal is heightened by a generous garnish of finely chopped fresh green parsley and tiny dark thyme leaves. Every bite offers a sophisticated balance of creamy cheese, earthy herbs, and a sharp hit of cracked black pepper, making the Cottage Cheese Flatbread a versatile powerhouse for any meal of the day.
Why This Protein-Packed Flatbread is a Kitchen Game-Changer
- Unrivaled Texture: The moisture from the cottage cheese creates a crumb that is tender yet structurally sound enough to hold your favorite toppings.
- Artisan Visuals: The pan-searing method produces beautiful charred, dark brown blistered spots that look like they came straight from a wood-fired oven.
- Macro-Friendly: Packed with protein from the cottage cheese, this flatbread keeps you satiated much longer than standard white bread.
- Herb-Infused Aroma: The combination of fresh parsley and thyme leaves released into the residual heat of the bread creates an irresistible fragrance.
Essential Components for Your Cottage Cheese Flatbread
Full-Fat Small Curd Cottage Cheese: Use 1 cup (225g) for the dough and an extra 1/4 cup (55g) for the topping. The fat content is crucial for a soft mouthfeel and ensuring the crumbles on top melt into a creamy, slightly charred texture.
All-Purpose Flour (or Self-Rising): You will need 1.5 cups (190g) to provide the necessary structure. Flour interacts with the cottage cheese proteins to create a pliable dough that holds its oval shape during the searing process.
Baking Powder: Include 1 tsp (5g) if using all-purpose flour. This is the “invisible” lifting agent that ensures your flatbread isn’t a dense cracker but a fluffy, aerated delight.
Fine Sea Salt: Add 1/2 tsp (3g) to the dry mix. Salt doesn’t just season; it strengthens the gluten network, helping you achieve that “slightly chewy” texture described in the visual blueprint.
Fresh Parsley and Thyme: Use 2 tbsp (8g) of finely chopped parsley and 1 tsp (2g) of fresh thyme leaves. These herbs provide the vibrant green contrast and earthy top notes that define the rustic aesthetic.
Extra Virgin Olive Oil: Have 2 tbsp (30ml) ready for the pan. A high-quality oil is necessary to achieve the “golden-brown” finish and those iconic “blistered spots” without sticking.
Coarse Black Pepper: Use 1/2 tsp (1g) of freshly cracked pepper. The “black pepper specks” mentioned in the visual prompt aren’t just for show; they provide a subtle heat that cuts through the richness of the cheese.
Must-Have Equipment for Professional Results
To achieve the specific “handheld smartphone photo” quality of a professional dish, you need a heavy-bottomed cast iron skillet or a high-quality non-stick pan. This ensures even heat distribution, which is the secret to those dark brown charred spots.
A flexible silicone spatula is also essential for flipping the oval shapes without tearing the soft dough. Lastly, a dark wood cutting board serves as the perfect rustic backdrop for serving, just as seen in the visual recipe blueprint.
The Master Method for Hand-Crafted Flatbread
Phase 1: Preparing the Protein Dough
In a large mixing bowl, combine 1 cup (225g) of cottage cheese with your flour, baking powder, and salt. Use a sturdy spoon to mix until a shaggy dough forms, then transition to your hands.
Knead the dough for about 2-3 minutes directly in the bowl. You are looking for a soft, slightly tacky (but not sticky) consistency that feels elastic under your palms.
Phase 2: Shaping the Rustic Ovals
Divide the dough into four equal portions. On a lightly floured surface, use a rolling pin or the palm of your hand to press each piece into an oval shape, roughly 1/2 inch (1.25cm) thick.
Don’t worry about perfect symmetry; the goal is a “rustic, oval-shaped” look. Ensure the edges are slightly uneven to catch the olive oil and char beautifully in the pan.
Phase 3: Searing for Maximum Char
Heat your 2 tbsp (30ml) of olive oil in a skillet over medium-high heat. Wait until the oil shimmers; this is the sensory cue that the pan is hot enough to create an immediate sear.
Place the flatbread in the pan and cook for 2-3 minutes. You should hear a gentle sizzling sound. Flip the bread once you see “prominent charred, dark brown and blistered spots” forming on the underside.

Phase 4: Topping and Melting
Immediately after flipping, sprinkle the reserved 1/4 cup (55g) of cottage cheese crumbles over the hot surface. Cover the pan with a lid for 30 seconds to allow the cheese to become “melted and slightly crumbled.”
Remove the lid and garnish generously with your finely chopped fresh green parsley, tiny dark thyme leaves, and specks of black pepper. The residual heat will slightly wilt the herbs, intensifying their flavor.
Expert Culinary Tips for Flatbread Success
- Moisture Control: If your cottage cheese is very watery, strain it through a fine-mesh sieve for 5 minutes before adding it to the flour. This prevents the dough from becoming a sticky mess.
- The “Lid” Trick: Using a lid during the final stage of cooking creates a localized steam environment, ensuring the cottage cheese dollops melt perfectly without overcooking the bottom of the bread.
- Searing Temperature: If your flatbread is browning too fast without cooking through, drop the heat to medium. The “golden-brown” color should be achieved at the same time the interior finishes.
- Herb Freshness: Always chop your parsley right before serving. Pre-chopped herbs lose their bright green color and “fresh” aroma quickly when exposed to air.
How to Store and Reheat Your Creations
The Cottage Cheese Flatbread is best enjoyed fresh from the pan while the cheese is still melted. However, you can store leftovers in an airtight container in the refrigerator for up to 3 days.
To reheat, avoid the microwave as it can make the dough rubbery. Instead, place the flatbread back in a dry skillet over medium heat for 1-2 minutes per side until the charred spots crisp up again.
For long-term storage, flash-freeze the flatbreads on a baking sheet before transferring them to a freezer bag. They will stay fresh for up to 2 months. Reheat directly from frozen in a 350°F (175°C) oven for 5-7 minutes.
What to Serve With Cottage Cheese Flatbread
This versatile bread pairs beautifully with a variety of Mediterranean and American comfort dishes. For a high-protein lunch, serve it alongside these Ground Beef Taco Bowls for an extra dose of savory flavor.
If you are looking for a cozy dinner pairing, the rustic texture of the flatbread is perfect for dipping into a bowl of Jalapeno Popper Chicken Soup. The creaminess of the soup complements the melted cottage cheese dollops perfectly.
For those who love a breakfast-for-dinner vibe, these flatbreads make an excellent side to Make-Ahead Egg Muffins. You can even use the flatbread as a base for a quick pizza, similar to the flavors found in Pizza Sliders.
Frequently Asked Questions
Yes, you can substitute the all-purpose flour with a 1:1 gluten-free baking flour blend. Ensure it contains xanthan gum to maintain the chewy texture.
You can, but the flatbread will be less tender and won’t have the same golden-brown richness. Full-fat or 2% cottage cheese is recommended for the best flavor.
Not at all. Once cooked, the cottage cheese provides a mild, creamy flavor similar to a sourdough or yogurt-based bread, rather than a strong cheese taste.
Do not over-knead the dough. Kneading for just 2-3 minutes ensures enough gluten for structure without making the bread tough or dense.
Charred spots occur due to high heat and the Maillard reaction. Ensure your skillet is pre-heated until the oil shimmers before adding the dough.
The Complete Cottage Cheese Flatbread Recipe
Cottage Cheese Flatbread: The Ultimate High-Protein Rustic Recipe
Equipment
- 1 Cast Iron Skillet Essential for achieving charred spots.
- 1 Mixing bowl For preparing the dough.
- 1 Silicone spatula For flipping the ovals.
Ingredients
Main Ingredients
- 1 cup full-fat small curd cottage cheese 225g; for the dough
- 1.5 cups all-purpose flour 190g
- 1 tsp baking powder 5g
- 0.5 tsp sea salt 3g
- 0.25 cup cottage cheese crumbles 55g; reserved for topping
- 2 tbsp fresh parsley 8g; finely chopped
- 1 tsp fresh thyme leaves 2g
- 0.5 tsp black pepper 1g; freshly cracked
- 2 tbsp extra virgin olive oil 30ml; for searing
Instructions
Prepare the Dough
- In a large bowl, combine the 1 cup (225g) cottage cheese, flour, baking powder, and salt until a shaggy dough forms.
- Knead by hand for 2-3 minutes until the dough is smooth, elastic, and slightly tacky.
Shape and Cook
- Divide dough into 4 pieces. Flatten each into a rustic oval shape, approximately 1/2 inch thick.
- Heat olive oil in a skillet over medium-high heat. Sear flatbread for 2-3 minutes until deep golden-brown with dark charred spots.
- Flip the bread. Immediately top with reserved cottage cheese dollops. Cover with a lid for 30 seconds to melt the cheese.
- Remove from heat. Garnish with chopped parsley, thyme, and black pepper specks. Serve warm.
Notes
If the dough is too sticky, add flour 1 tablespoon at a time.

Join the Spiced Bites Community!
The Cottage Cheese Flatbread is a testament to how simple ingredients like flour and cheese can transform into a gourmet experience. Whether you’re making this for a quick protein fix or a dinner party appetizer, it’s sure to impress with its rustic charm and charred finish.
Did you try this recipe? We’d love to see your “blistered spots” and “melted crumbles”! Leave a comment below and let us know how it turned out. Don’t forget to share your photos and follow us on Pinterest for more culinary inspiration.
Happy cooking, and enjoy every chewy, herb-filled bite!