The Cookie Dough Cheesecake is a masterpiece of textures, combining the nostalgic comfort of raw cookie dough with the sophisticated elegance of a perfectly baked New York-style cheesecake. Imagine sinking your fork into a thick, creamy off-white filling that is densely packed with buttery, chocolate chip-laden chunks. The contrast provided by the dark, crumbly chocolate cookie crust makes every bite a balanced symphony of sugar and cocoa.
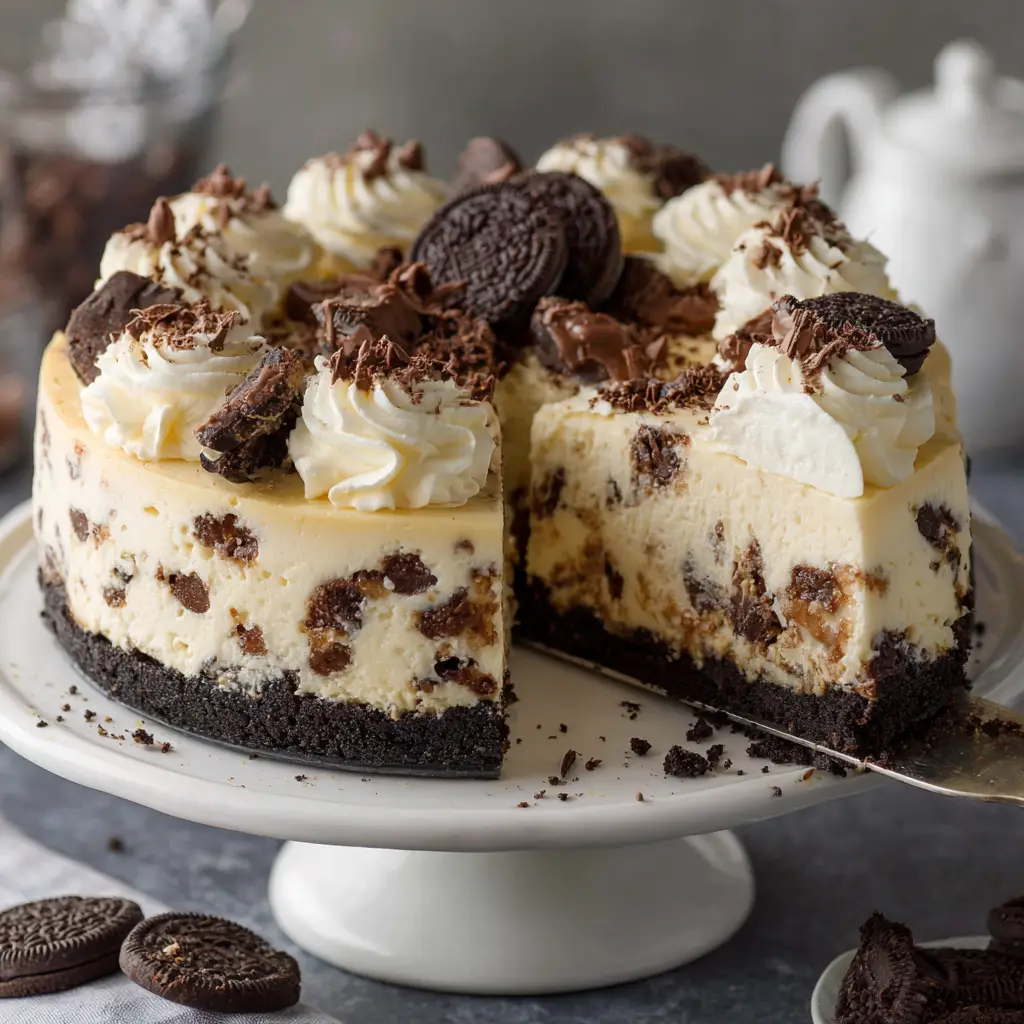
What sets this specific Cookie Dough Cheesecake apart is the meticulous attention to visual detail and structural integrity. From the uniform rosettes of whipped cream to the delicate fine chocolate shavings dusted over the top, this dessert is designed to be the centerpiece of any table. Whether you are hosting a formal dinner or a casual weekend gathering, this cheesecake delivers a professional, bakery-quality result every single time.
As you remove that first slice, you will reveal the beautiful interior layers—a sight that is as satisfying to look at as it is to eat. The side-lit natural daylight highlights the velvety texture of the filling and the distinct, rugged edges of the cookie dough chunks. It is a dessert that looks like it belongs in a high-end culinary magazine but tastes like home-baked perfection.
Why This Loaded Cookie Dough Masterpiece Works
- Textural Contrast: The crunch of the chocolate cookie crust pairs perfectly with the silkiness of the cheesecake and the soft, chewy cookie dough chunks.
- Visually Stunning Garnish: The combination of whipped cream rosettes, whole chocolate buttons, and crumbled cookies creates a multi-dimensional aesthetic.
- Scientific Balance: By using professional-grade ratios of cream cheese and sour cream, we ensure a filling that is sturdy enough to hold heavy dough chunks without sinking.
- Safety-First Ingredients: We use heat-treated flour and eggless dough recipes to ensure the “raw” dough chunks are 100% safe for consumption.
Everything You Need for This Cookie Dough Cheesecake
Chocolate Sandwich Cookies: You will need 24 cookies (approx. 280g) for the base. These provide the deep, dark cocoa flavor and the essential crumbly texture required for the foundation.
Unsalted Butter: 5 tbsp (70g) of melted butter acts as the glue for your crust. It adds a rich, savory note that balances the sweetness of the chocolate.
Full-Fat Cream Cheese: 3 blocks (675g/24oz) are necessary for the structure. Ensure it is at room temperature to avoid lumps and achieve that signature “off-white” creamy look.
Granulated Sugar: 1 cup (200g) provides sweetness while also helping to aerate the cream cheese during the initial mixing phase.
Sour Cream: 1/2 cup (120ml) adds a subtle tang and contributes to the velvety, melt-in-your-mouth interior of the Cookie Dough Cheesecake.
Large Eggs: 3 eggs act as the binding agent. They provide the protein structure that allows the cheesecake to set firmly while remaining creamy.
Vanilla Extract: 1 tbsp (15ml) of high-quality extract enhances the floral notes of the cheesecake and bridges the flavors of the dough and filling.
Heat-Treated Flour: 1.5 cups (180g) for the cookie dough chunks. Heating the flour to 160°F (71°C) eliminates bacteria, making the raw dough chunks safe to eat.
Mini Semi-Sweet Chocolate Chips: 1 cup (175g) for the dough. Mini chips are preferred so they distribute evenly throughout the cheesecake filling.
Heavy Whipping Cream: 1 cup (240ml) for the rosettes. This must be cold to ensure it whips into stiff, stable peaks that hold their shape.
Whole Chocolate Buttons and Shavings: These are the “hero” garnishes. Use high-quality dark or milk chocolate buttons and a block of chocolate for the fine shavings.
The Essential Tools for a Professional Result
To achieve the look of a bakery-style Cookie Dough Cheesecake, you will need a 9-inch (23cm) springform pan. This allows for the clean removal of the sides, revealing those perfect layers without damaging the crust. A food processor is vital for pulsing the chocolate cookies into a fine, uniform sand for the base.
An electric stand mixer or hand mixer is required to incorporate air into the cream cheese without overworking the eggs. Finally, a piping bag fitted with a large star tip (like a 1M or 2D) is necessary to create the elegant whipped cream rosettes seen in the visual blueprint.
The Step-by-Step Guide to Cheesecake Perfection
Crafting the Dark Crumbly Crust
Preheat your oven to 325°F (165°C). Pulse the chocolate cookies in a food processor until they are fine crumbs. Combine the crumbs with the melted butter in a medium bowl, stirring until the mixture resembles wet sand.
Press the mixture firmly into the bottom of your springform pan. Use the flat bottom of a measuring cup to ensure the crust is even and packed tightly. Bake for 10 minutes to set the structure, then let it cool completely while you prepare the filling.
Preparing the Safe “Raw” Cookie Dough Chunks
Spread your flour on a baking sheet and bake at 350°F (175°C) for 5-7 minutes until it reaches 160°F (71°C). In a separate bowl, cream together 1/2 cup (115g) butter and 1/2 cup (100g) brown sugar. Add 2 tbsp (30ml) of milk and 1 tsp (5ml) vanilla.
Fold in the heat-treated flour and mini chocolate chips until a stiff dough forms. Roll the dough into small, marble-sized chunks. Place these on a plate and freeze them for at least 20 minutes; this prevents them from melting or bleeding into the off-white cheesecake batter during baking.
Mixing the Creamy Off-White Filling
In a large bowl, beat the room-temperature cream cheese and granulated sugar until completely smooth and fluffy. Add the sour cream and vanilla extract, mixing until just combined. You should see a pale, creamy consistency with no visible lumps.
Add the eggs one at a time, mixing on the lowest speed. Stop as soon as the yellow streaks disappear. Over-mixing at this stage incorporates too much air, which can cause the Cookie Dough Cheesecake to crack. Gently fold in 3/4 of your frozen cookie dough chunks by hand.
The Bake and the Chill
Pour the batter over the cooled crust and smooth the top with a spatula. Drop the remaining cookie dough chunks onto the surface, pressing them slightly into the batter. Bake for 55-65 minutes. Look for the visual cue: the edges should be set and slightly puffed, but the center should still have a slight “wobble” like Jello when shaken.
Turn off the oven and prop the door open with a wooden spoon for one hour. This slow cooling process is the secret to a crack-free surface. Once cooled to room temperature, refrigerate the cheesecake for at least 6 hours, or ideally overnight, to allow the fats to solidify into a dense, creamy texture.

The Final Garnish and Presentation
Once fully chilled, carefully run a thin knife around the edge of the pan before releasing the springform ring. Whip your heavy cream and powdered sugar until stiff peaks form. Pipe 8 to 10 large rosettes around the perimeter of the cheesecake.
In the spaces between rosettes, place whole chocolate buttons and clusters of crumbled chocolate cookies. Finally, use a vegetable peeler or a fine grater to shower the entire top with fine chocolate shavings. This adds a professional “finished” look that mimics the handheld smartphone photo style of the prompt.
Pro Secrets for a Smooth, Crack-Free Cheesecake
- Room Temp is Mandatory: Cold cream cheese will result in a lumpy batter that no amount of whisking can fix. Leave your ingredients out for 2 hours before starting.
- The Water Bath Trick: For the ultimate insurance against cracks, wrap the pan in foil and place it in a larger roasting pan filled with 1 inch (2.5cm) of hot water.
- Don’t Peek: Resist the urge to open the oven door during the first 45 minutes. Drastic temperature drops are the primary cause of cheesecake “sinkage.”
- Clean Slices: To get a perfect slice like the one in our visual guide, dip a sharp knife into hot water and wipe it clean between every single cut.
Storage and Make-Ahead Instructions
The Cookie Dough Cheesecake is an excellent candidate for make-ahead prep. It actually tastes better on day two as the vanilla and cookie flavors have time to meld with the cream cheese. Store the cheesecake in an airtight container in the refrigerator for up to 5 days.
If you wish to freeze the cheesecake, do so before adding the whipped cream and garnishes. Wrap the entire chilled cake in a double layer of plastic wrap and a layer of aluminum foil. It will stay fresh for up to 3 months. Thaw in the refrigerator overnight before decorating and serving.
What to Serve With This Decadent Dessert
Because this cheesecake is incredibly rich and chocolate-heavy, it pairs beautifully with something bright or savory to cleanse the palate. If you are serving this as part of a larger spread, consider starting the meal with something light like ginger soy fish or perhaps some spinach and ricotta manicotti.
For those looking for a diverse dessert table, this cheesecake stands out next to a lighter lemon custard cake or a fruity coconut ricotta cake. The contrast between the heavy chocolate and the bright citrus or coconut notes is always a crowd-pleaser.
Frequently Asked Questions
You can, but ensure it is a brand labeled safe for raw consumption, or bake the chunks into small pieces first. Homemade heat-treated dough is recommended for the best texture.
Prevent cracks by using room temperature ingredients, avoiding over-mixing the eggs, and letting the cheesecake cool slowly in the oven with the door propped open.
For the perfect clean slice, the cheesecake must chill for at least 6 hours, though overnight (12-24 hours) is ideal for the flavors to fully develop.
Yes! We use heat-treated flour and an eggless cookie dough recipe to ensure the chunks are completely safe to consume even though they aren’t fully ‘baked’ in the traditional sense.
Freezing the dough chunks before folding them in and ensuring your cheesecake batter is thick (using full-fat ingredients) will help keep the chunks suspended throughout the filling.
The Ultimate Cookie Dough Cheesecake Recipe Card
Cookie Dough Cheesecake: The Ultimate Loaded Dessert Experience
Equipment
- 1 9-inch Springform Pan Essential for clean removal.
- 1 Food Processor For the cookie crust crumbs.
- 1 Electric mixer Stand or hand mixer.
- 1 Piping Bag and Star Tip For whipped cream rosettes.
Ingredients
Chocolate Cookie Crust
- 24 cookies Chocolate sandwich cookies Approx 280g
- 5 tbsp Unsalted butter Melted (70g)
Edible Cookie Dough Chunks
- 1.5 cups All-purpose flour Heat-treated (180g)
- 1/2 cup Unsalted butter Softened (115g)
- 1/2 cup Brown sugar Packed (100g)
- 1 cup Mini chocolate chips Semi-sweet (175g)
Cheesecake Filling
- 24 oz Cream cheese 3 blocks, room temp (675g)
- 1 cup Granulated sugar 200g
- 1/2 cup Sour cream 120ml
- 3 large Eggs Room temperature
- 1 tbsp Vanilla extract 15ml
Garnish
- 1 cup Heavy whipping cream Cold (240ml)
- 8-10 whole Chocolate buttons For decoration
- 1/4 cup Chocolate shavings Fine
Instructions
Prepare the Base
- Pulse cookies into fine crumbs, mix with melted butter, and press into a 9-inch springform pan. Bake at 325°F (165°C) for 10 minutes.
Make the Dough Chunks
- Heat-treat flour to 160°F. Cream butter and sugar, add flour and chips. Roll into small chunks and freeze for 20 minutes.
Bake the Cheesecake
- Beat cream cheese and sugar until smooth. Add sour cream and vanilla. Fold in eggs slowly, then 3/4 of the dough chunks.
- Pour into pan and bake for 55-65 minutes until edges are set but the center wobbles slightly. Cool slowly in the oven.
Garnish
- Pipe whipped cream rosettes. Top with chocolate buttons, crumbled cookies, and fine chocolate shavings.
Notes
Slowly cool the cheesecake in the oven to prevent cracks.
Join the Spiced Bites Community!
This Cookie Dough Cheesecake is more than just a recipe; it is a guaranteed way to impress your friends and family with your culinary prowess. The combination of the dark chocolate crust and the chunk-filled interior makes it a visual and flavorful triumph. We would love to see your creations!
If you enjoyed this recipe, please leave a comment below and let us know how your garnishing turned out. Don’t forget to sign up for our newsletter for more elite recipes delivered straight to your inbox. Be sure to share this post and follow us on Pinterest for more daily inspiration!


