There is a specific kind of magic found in a scoop of authentic Coffee Gelato that standard ice cream simply cannot replicate. It is not just about the caffeine; it is about that specific milk-chocolate-brown hue and a texture so dense it feels like velvet on the tongue.
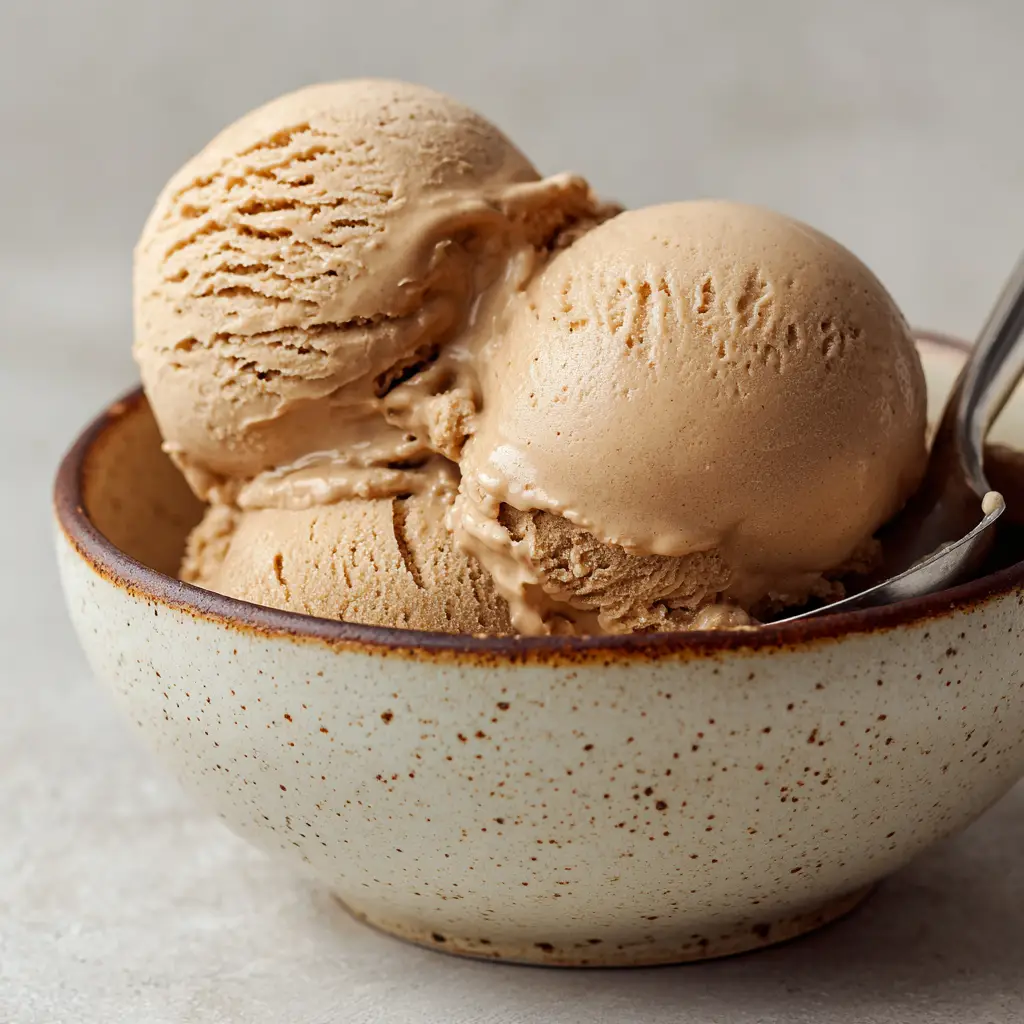
When you look at a perfectly served bowl of this frozen treat, you should see those iconic soft folds and ridges left by the scoop. It is a visual promise of the creamy, slow-melting experience that awaits in every bite of this Italian masterpiece.
This recipe is designed to help you achieve that exact professional result at home, right down to the rustic presentation. Whether you are finishing a heavy meal of smothered chicken or looking for a sophisticated afternoon pick-me-up, this Coffee Gelato delivers.
Why This Coffee Gelato Recipe Works
- Visual Perfection: We utilize a specific custard base to achieve that exact milk-chocolate-brown color described in our visual blueprint.
- Scientific Texture: By balancing the milk-to-cream ratio, we ensure a dense, velvety finish rather than an airy, icy one.
- Intense Coffee Profile: Using both steeped grounds and espresso ensures a multi-dimensional flavor that lingers.
- Structural Integrity: This recipe creates a gelato that holds those beautiful “folds and ridges” when scooped into your favorite rustic bowl.
The Anatomy of a Perfect Milk-Chocolate-Brown Gelato
To achieve the visual and textural results seen in high-end Italian gelaterias, we have to look closely at our ingredient selection. Gelato is lower in fat and air than American ice cream, which is why it looks so much smoother in the bowl.
Whole Milk (480ml / 2 cups): This is the backbone of our gelato. Unlike ice cream, which relies heavily on cream, gelato uses more milk to allow the coffee flavor to shine through without being masked by butterfat.
Heavy Cream (240ml / 1 cup): We use just enough to provide that “smooth, velvety texture” mentioned in our visual prompt. Too much would make the gelato too fluffy; we want density.
Granulated Sugar (150g / 3/4 cup): Sugar isn’t just for sweetness; it lowers the freezing point. This ensures the gelato remains scoopable and develops those beautiful ridges.
Egg Yolks (4 Large Yolks): These are critical for the “milk-chocolate-brown” color. The yellow of the yolks mixes with the dark coffee to create that specific, warm aesthetic.
Finely Ground Espresso Beans (30g / 4 tbsp): We steep these directly in the dairy. This “forensic” approach extracts the deep pigments and oils required for that authentic look.
Pure Vanilla Extract (5ml / 1 tsp): A foundational “invisible” ingredient that rounds out the bitterness of the coffee. It adds a layer of aromatic complexity.
Sea Salt (1g / 1 pinch): Salt is a flavor enhancer that makes the coffee taste “more like coffee” and the cream taste sweeter.
Essential Equipment for Professional Results
To get that eye-level, smartphone-photo-worthy look, you need the right tools. A standard ice cream maker is essential, but the serving pieces matter just as much for the final aesthetic.
You will need a heavy-bottomed saucepan to prevent the milk from scorching. A fine-mesh strainer is also non-negotiable for removing the coffee grounds and any tiny bits of cooked egg, ensuring a “smooth” finish.
For the presentation, seek out a rustic, handmade ceramic bowl—ideally light beige with dark speckles and an unglazed rim. And don’t forget a shiny metal spoon to lean against the side for that perfect “lived-in” kitchen vibe.
The Masterclass: Steeping and Tempering for Flavor
Infusing the Dairy with Deep Coffee Notes
Place your milk, half of the sugar, and the espresso grounds into your saucepan. Heat over medium-low until you see small bubbles forming around the edges (about 175°F or 80°C).
Do not let it reach a rolling boil, as this can change the protein structure of the milk. Remove from heat, cover, and let the coffee steep for 20 minutes to achieve that deep brown tint.
The Secret to a Silky Custard Base
While the coffee steeps, whisk your egg yolks with the remaining sugar in a separate bowl. You are looking for a “ribbon stage” where the mixture is pale and thick.
Slowly ladle the warm coffee-milk into the yolks while whisking constantly. This “tempering” process prevents the eggs from scrambling, which is vital for a velvety texture.

Cooking to the Perfect Density
Return the mixture to the saucepan and cook over low heat. Use a wooden spoon and stir in a figure-eight motion until the custard coats the back of the spoon.
You will know it is ready when you can draw a clean line through the custard on the back of the spoon with your finger. Immediately strain the mixture through a fine-mesh sieve into a clean bowl.
Churning and Achieving the Perfect Scoop
Once your custard is completely chilled (ideally overnight), pour it into your ice cream maker. Gelato should be churned at a slower speed than ice cream to minimize the amount of air (overrun) incorporated.
Watch for the “visual cues”: the mixture will transition from a liquid to a thick, soft-serve consistency. It should look matte and hold its shape as the paddle moves through it.
Transfer the gelato to a shallow container and freeze for at least 4 hours. When you are ready to serve, let it sit on the counter for 5-10 minutes. Use a sturdy scoop to create three piles, ensuring you drag the scoop to create those “visible soft folds and ridges.”
Expert Tips for Success
- Chill Your Bowl: Always place your rustic ceramic bowl in the freezer for 15 minutes before serving to prevent the gelato from melting too quickly.
- Quality of Coffee: Since coffee is the primary flavor, avoid “instant” powders if you want that professional depth. Use freshly ground beans.
- The “Spoon” Trick: For the most realistic photo, use a shiny metal spoon that has been dipped in warm water and wiped dry.
- Storage Matters: Press a piece of parchment paper directly onto the surface of the gelato in the container to prevent ice crystals from forming.
What to Serve With This Coffee Gelato
Coffee Gelato is incredibly versatile. For a light summer dessert, serve it alongside a slice of lemon custard cake for a bright citrus contrast.
If you prefer a more decadent pairing, the coffee notes perfectly complement the tropical sweetness of a coconut ricotta cake. The ricotta in the cake echoes the creamy profile of the gelato beautifully.
For a fun, kid-friendly dessert bar, you could even serve small scoops alongside banana oat cookies for a “coffee and cookies” afternoon treat.
Frequently Asked Questions
While an ice cream maker provides the best ‘velvety’ texture, you can use the ‘still freeze’ method by whisking the mixture every 30 minutes, though it will be less smooth.
It contains a moderate amount—roughly equivalent to half a cup of coffee per serving—depending on the strength of the espresso beans used for steeping.
The color comes from steeping finely ground espresso beans directly in the dairy and combining that infusion with rich egg yolks, creating a warm, brown custard base.
Gelato uses a higher proportion of milk to cream, has less air incorporated during churning, and is served at a slightly warmer temperature, resulting in a denser, more flavorful experience.
Ice crystals usually form if the mixture wasn’t chilled long enough before churning or if it was stored without a protective layer like parchment paper pressed against the surface.
The Authentic Coffee Gelato Recipe Card
Coffee Gelato: The Ultimate Creamy Italian Espresso Recipe
Equipment
- 1 Ice Cream Maker Essential for the churning process.
- 1 Fine Mesh Strainer To ensure a smooth, velvety texture.
- 1 Heavy-bottomed saucepan Prevents dairy from scorching.
Ingredients
Ingredients
- 2 cups (480ml) Whole Milk Provides the structural base.
- 1 cup (240ml) Heavy Cream Adds the necessary velvety fat content.
- 3/4 cup (150g) Granulated Sugar Divided use.
- 4 large Egg Yolks Crucial for the brown hue and mouthfeel.
- 4 tbsp (30g) Espresso Beans Finely ground for steeping.
- 1 tsp (5ml) Vanilla Extract Enhances the coffee profile.
- 1 pinch Sea Salt Balancing agent.
Instructions
Infuse and Steep
- In a heavy saucepan, combine milk, 1/2 of the sugar, and coffee grounds. Heat over medium-low until it reaches 175°F (80°C).
- Remove from heat, cover, and let steep for 20 minutes to develop the deep milk-chocolate-brown color.
Create the Custard
- Whisk egg yolks and remaining sugar until thick and pale.
- Slowly whisk the warm milk into the yolks, then return to the pan and cook until it coats the back of a spoon.
Churn and Serve
- Strain and chill the mixture overnight. Churn in an ice cream maker according to manufacturer's instructions.
- Scoop into a rustic bowl, ensuring you create three distinct scoops with visible folds and ridges.
Notes
Use a light-beige speckled bowl to match the visual aesthetic.

Bring the Italian Gelateria to Your Kitchen
Creating this Coffee Gelato is about more than just following steps; it is about embracing the patience of the Italian culinary tradition. From the slow steep of the espresso grounds to the careful tempering of the yolks, every action contributes to that final, velvety scoop.
The result is a dessert that looks exactly like a professional handheld smartphone photo from a Roman holiday—creamy, milk-chocolate-brown, and perfectly ridged. We would love to see your results!
Leave a comment below if you have any questions about the churning process, and don’t forget to share your beautiful rustic bowl shots to Pinterest!


