Get ready to discover your new favorite dessert. This No-Bake Butterfinger Pie is the ultimate crowd-pleaser, combining a rich, creamy peanut butter filling with the irresistible crunch of Butterfinger candy bars, all nestled in a decadent Oreo cookie crust. It’s a ridiculously easy recipe that delivers a show-stopping dessert with minimal effort.
If you’re searching for a quick and impressive treat for a potluck, a holiday gathering, or just a simple weeknight indulgence, this is the recipe for you. There’s no need to turn on your oven, making it the perfect year-round dessert. Let’s dive in!

Why You’ll Love This No-Bake Butterfinger Pie
- Incredibly Easy: With simple ingredients and no baking required, this pie comes together in just minutes. It’s a perfect recipe for beginner cooks.
- Crowd-Pleasing Flavor: The combination of creamy peanut butter, chocolate, and crunchy Butterfingers is a proven winner for all ages.
- Perfect Make-Ahead Dessert: You can prepare this pie a day or two in advance, making it ideal for stress-free entertaining.
- No Oven Needed: Keep your kitchen cool! This is a fantastic dessert option for warm summer months.
Ingredients You’ll Need
This recipe uses simple, easy-to-find ingredients to create a truly spectacular dessert. Here’s what you’ll need to grab from the store.
For the Oreo Crust:
- Oreo Cookies: You’ll need about 24 cookies to create the perfect chocolatey base.
- Unsalted Butter: Melted butter binds the cookie crumbs together to form a firm crust.
For the Creamy Butterfinger Filling:
- Cream Cheese: Use a full-fat block, softened to room temperature for a smooth, lump-free filling.
- Creamy Peanut Butter: A good quality commercial brand works best for consistency.
- Powdered Sugar: This sweetens the filling and helps it set up perfectly.
- Whipped Topping: One container of thawed Cool Whip or a similar product makes the filling light and airy.
- Butterfinger Candy Bars: The star of the show! You’ll need about 8-10 fun-size bars, coarsely chopped.
How to Make the Perfect No-Bake Butterfinger Pie (Step-by-Step)
Making this creamy Butterfinger dessert is as simple as 1-2-3. Follow these steps for pie perfection.
Step 1: Prepare the Oreo Crust
First, crush the Oreo cookies into fine crumbs using a food processor or a zip-top bag and a rolling pin. In a medium bowl, mix the crumbs with the melted butter until fully combined. Press the mixture firmly and evenly into the bottom and up the sides of a 9-inch pie dish. Place the crust in the freezer to set while you prepare the filling.
Step 2: Make the Filling
In a large bowl, use an electric mixer to beat the softened cream cheese and creamy peanut butter until smooth and well combined. Gradually add the powdered sugar and continue to beat until no lumps remain. Gently fold in the thawed whipped topping and half of the chopped Butterfinger candy bars until just combined. Be careful not to overmix.

Step 3: Assemble and Chill
Retrieve the chilled crust from the freezer. Spoon the Butterfinger filling into the crust, spreading it evenly. Sprinkle the remaining chopped Butterfinger bars over the top. For an extra touch, you can drizzle with chocolate or caramel sauce. Cover the pie with plastic wrap and refrigerate for at least 6 hours, or preferably overnight, to allow it to set completely.
Pro Tips for Recipe Success
- Room Temperature Ingredients: Ensure your cream cheese is fully softened to avoid a lumpy filling. This is the key to that signature silky texture.
- Chill Thoroughly: Don’t rush the chilling process! The pie needs at least 6 hours in the fridge to set properly for clean, beautiful slices.
- Chopping the Candy: For the best texture, chop the Butterfingers into varied sizes—some smaller pieces to mix in and some larger chunks for the topping.
- Easy Slicing: For ultra-clean slices, dip a sharp knife in hot water and wipe it dry between each cut.
Delicious Variations to Try
While this No-Bake Butterfinger Pie recipe is fantastic as is, it’s also fun to customize! For another delicious no-bake option, you might enjoy this creamy no-bake pecan pie.
- Different Crust: Try a graham cracker crust or a crust made from Nutter Butter cookies for a different flavor profile.
- Add Chocolate: Drizzle the top with melted chocolate or a rich chocolate ganache for extra decadence.
- Caramel Drizzle: A generous drizzle of caramel sauce over the top complements the peanut butter and Butterfinger flavors perfectly. If you love caramel, check out these salted caramel chocolate chip cookie bars.
How to Store Your Butterfinger Pie
This pie stores beautifully, making it a perfect make-ahead dessert. Store it tightly covered in the refrigerator for up to 4-5 days. You can also freeze the pie for longer storage. To freeze, let it set completely in the fridge, then wrap it securely in plastic wrap and then aluminum foil. It will keep in the freezer for up to 2 months. Thaw in the refrigerator for a few hours before serving.
Frequently Asked Questions
Yes, absolutely! This pie freezes very well. Once it has set in the fridge, wrap it securely in plastic wrap and then a layer of aluminum foil. It can be stored in the freezer for up to 2 months. Thaw it in the refrigerator for a few hours before serving.
Definitely! While the Oreo crust is a classic pairing, a graham cracker crust would also be delicious. For an extra peanut butter kick, you could even try a crust made from crushed Nutter Butter cookies.
When stored properly in a covered container, the No-Bake Butterfinger Pie will stay fresh and delicious for up to 5 days in the refrigerator.
For this recipe, a stabilized whipped topping like Cool Whip is recommended because it provides stability and helps the pie set firmly. While you can use homemade sweetened whipped cream, the pie may have a softer set.
If you can’t find Butterfingers or want to try something different, you could substitute them with other crunchy candy bars like Heath bars, Reese’s Peanut Butter Cups, or even chopped chocolate-covered pretzels for a sweet and salty twist.
More Dessert Recipes You’ll Love
If you’re looking for more show-stopping treats that are sure to impress, don’t miss our famous Apple Pie Cheesecake Cookies. They combine two classic desserts into one incredible bite!
Share Your Creation!
We are so excited for you to try this amazing No-Bake Butterfinger Pie recipe! If you make it, please leave a comment below and let us know how it turned out. We love hearing from you! For more delicious inspiration, be sure to follow us on Pinterest.

No-Bake Butterfinger Pie
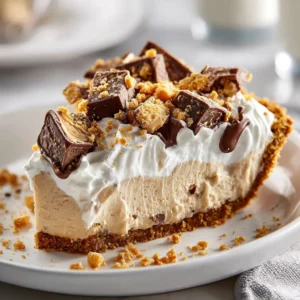
No-Bake Butterfinger Pie Recipe (Creamy & Easy!)
Equipment
- 1 9-inch pie dish
- 1 Electric mixer
- 1 Food Processor Optional, for crushing cookies
Ingredients
For the Oreo Crust
- 24 Oreo cookies
- 6 tbsp unsalted butter melted
For the Butterfinger Filling
- 8 oz cream cheese softened to room temperature
- 1 cup creamy peanut butter
- 1 cup powdered sugar
- 8 oz whipped topping (like Cool Whip) thawed
- 1 cup Butterfinger candy bars coarsely chopped, divided
Instructions
Prepare the Crust
- Crush the Oreo cookies into fine crumbs. In a medium bowl, mix the crumbs with the melted butter until fully combined.
- Press the mixture firmly into the bottom and up the sides of a 9-inch pie dish. Place the crust in the freezer to set while you prepare the filling.
Make the Filling
- In a large bowl, use an electric mixer to beat the softened cream cheese and creamy peanut butter until smooth.
- Gradually beat in the powdered sugar until no lumps remain. Gently fold in the thawed whipped topping.
- Fold in half of the chopped Butterfinger candy bars until just combined.
Assemble and Chill
- Spoon the Butterfinger filling into the chilled crust and spread evenly.
- Sprinkle the remaining chopped Butterfinger bars over the top. Refrigerate for at least 6 hours, or overnight, to allow it to set completely before slicing and serving.
Notes
Tip 2: Don't rush the chilling time! A well-chilled pie will slice cleanly and hold its shape perfectly.
Tip 3: Freeze the pie for 30 minutes before slicing for extra-clean cuts.


