There is nothing quite as nostalgic or comforting as a warm cookie, but these Chocolate Chip Bear Cookies take that sentiment to a whole new level of charm. These aren’t just your standard round treats; they are meticulously crafted, bear-shaped delights featuring soft, puffy centers and perfectly crisp, golden-brown edges.
Every bite of these Chocolate Chip Bear Cookies offers a textural symphony, combining the richness of milk chocolate chips within the “body” of the bear and the sharp, defined sweetness of dark chocolate chips for the facial features. Whether you are baking for a themed party or simply looking to brighten a rainy afternoon, these cookies deliver professional-grade visual appeal with a homemade soul.
By following this guide, you will master the art of cookie sculpting, ensuring your bears maintain their adorable limbs and ears without spreading into blobs. We will use culinary science to balance leavening and fat content, creating a dough that is as structural as it is delicious.
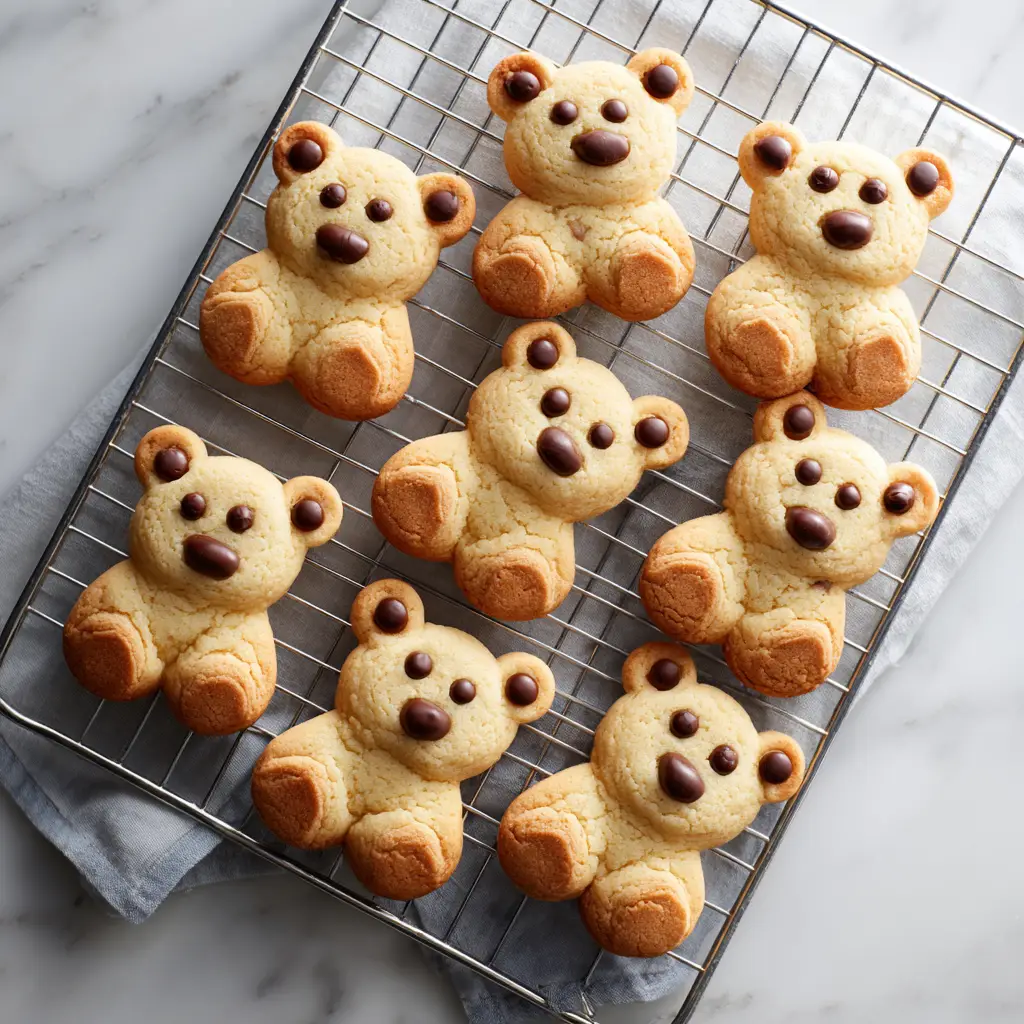
Why These Sculpted Bear Cookies Are a Baker’s Dream
- Perfectly Shaped Limbs: Our specialized dough-chilling technique ensures the head, body, arms, and legs stay distinct during the bake.
- Dual-Chocolate Dimension: We utilize milk chocolate chips for the body to provide a mellow sweetness and dark chocolate chips for the eyes, nose, and ears for high-contrast visual detail.
- Professional Texture: Expect a pale, soft-batch center with a contrasting snap at the edges, exactly like a high-end bakery.
- Handheld Masterpieces: These cookies look like they were pulled straight from a professional food stylist’s cooling rack.
The Essential Components for Structural Cookie Success
To achieve the visual result seen in our blueprint, you need more than just a standard recipe; you need a dough designed for “sculpting.” Here is what you will need for your Chocolate Chip Bear Cookies.
Unsalted Butter (1 cup / 227g): You must use softened, high-quality butter to create the emulsion necessary for that pale center. It provides the fat that carries the vanilla and sugar flavors throughout the palate.
Granulated White Sugar (1/2 cup / 100g): This is the secret to those “golden-brown edges.” White sugar caramelizes more readily than brown sugar, providing the structural crispness at the perimeter.
Light Brown Sugar (3/4 cup / 150g): The molasses content in brown sugar ensures the cookies remain “soft and slightly puffy.” It provides the moisture needed to keep the bear’s “body” tender.
All-Purpose Flour (2.5 cups / 312g): A slightly higher flour-to-fat ratio is used here compared to healthy banana oat cookies to ensure the bear limbs don’t melt away in the oven.
Milk Chocolate Chips (1 cup / 170g): These are pressed into the body of each bear to mimic “fur” or spots, providing a creamy, classic chocolate flavor.
Dark Chocolate Chips (1/2 cup / 85g): These are reserved for the “precision placement.” You will use these specifically for the eyes, the tip of the nose, and the inner ear detailing.
The “Invisible” Science: Don’t forget 1 teaspoon (5g) of baking soda for lift, 1/2 teaspoon (3g) of fine sea salt to balance the sugars, and 1 large egg to bind the sculptable dough together.
Professional Tools for Precision Shaping
Achieving the handheld smartphone photo aesthetic requires the right equipment. You will need a silver metal wire cooling rack to achieve that diagonal, professional cooling look.
A white and grey marble countertop is the ideal surface for rolling your dough balls, as the stone stays cool and prevents the butter in the dough from melting prematurely. You will also need parchment paper or silicone mats to ensure the delicate bear shapes release easily after baking.
The Step-by-Step Guide to Crafting Chocolate Chip Bear Cookies
1. Creating the Sculptable Dough Base
In a large bowl, cream together your softened butter, white sugar, and brown sugar until the mixture is light and aerated. Add the egg and a splash of vanilla extract, beating until the color lightens significantly—this ensures a “pale center.”
Sift in your flour, baking soda, and salt. Mix until just combined; overworking the dough will develop gluten and make your bears tough rather than soft and puffy.
2. The “Bear Anatomy” Assembly Process
To create each of your Chocolate Chip Bear Cookies, you will need to portion the dough into several small balls. For the body, roll a ball roughly 1.5 inches (4cm) in diameter; for the head, 1 inch (2.5cm); and for the limbs and ears, create six pea-sized balls.
On your lined baking sheet, place the body ball and gently press the head ball against the top. Attach the arms to the sides of the body and the legs to the bottom. Finally, place the two small ear balls on top of the head.
3. Visual Detailing and Chocolate Placement
Now, follow the visual blueprint precisely. Press 3-4 milk chocolate chips into the “body” section of each bear. They should look scattered but intentional.
Take your dark chocolate chips and place two for the eyes and one for the nose. For the ears, press a dark chocolate chip into the center of the small dough balls to create the “inner ear” look described in the Midjourney prompt.

4. The Precision Bake
Chill the entire tray of assembled bears for at least 30 minutes. This is a non-negotiable step to prevent your bear-shaped chocolate chip cookies from spreading into a single mass.
Bake at 350°F (175°C) for 10-12 minutes. Watch for the sensory cue: the edges should be a “perfect golden-brown” while the center remains “pale and soft.” They will look slightly underdone, but they will firm up on the silver cooling rack.
Expert Tips for Bakery-Quality Results
- The Toothpick Trick: If the ears or limbs look like they are detaching after baking, use a toothpick to gently push them back into the main body while the cookie is still hot and soft.
- Cold Hands, Warm Heart: If your hands are warm, the dough will become sticky. Rinse your hands in cold water and dry them before rolling the limbs to keep the dough manageable.
- Uniformity is Key: Use a small cookie scoop to ensure the “body” of every bear is the same size, which guarantees even baking across the tray.
- Contrast Check: Ensure your dark chocolate chips are “smaller” or “mini” if possible, as this makes the eyes and nose look more delicate and realistic.
The Best Way to Store and Refresh Your Bears
Once your Chocolate Chip Bear Cookies have cooled completely on the diagonal wire rack, store them in an airtight container at room temperature. They will stay soft for up to 4 days.
If you prefer that “just out of the oven” feel, microwave a single cookie for 8-10 seconds. This softens the milk chocolate chips in the body while making the dough tender again. For long-term storage, these bears freeze beautifully for up to 3 months—just thaw at room temperature for an hour before serving.
What to Serve with Your Adorable Creations
These cookies are a showstopper on their own, but they also pair beautifully with other whimsical desserts. If you are hosting a brunch, serve them alongside a refreshing lemon custard cake for a bright flavor contrast.
For a full chocolate immersion, pair them with a slice of rich chocolate coconut cake. If you are looking for something more adventurous, these cookies are a great “dessert appetizer” before serving cinnamon roll cheesecake chimichangas.
Common Questions About Shaped Cookies
You can use a 1:1 gluten-free flour blend, but ensure it contains xanthan gum to provide the elasticity needed to roll the small limb and ear balls.
Yes, mini dark chocolate chips are actually preferred for the eyes and nose as they provide more precise detailing for the bear’s features.
No, as long as the cookies have cooled for 2-3 minutes on the baking sheet first, they will be structural enough to transfer to the wire rack without sticking.
The key is chilling the dough for at least 30 minutes after assembly. This solidifies the butter, ensuring the limbs and ears maintain their shape while baking.
This is a sign of a perfectly baked soft-batch cookie! The white sugar caramelizes at the edges for crunch, while the brown sugar and shorter bake time keep the center soft.
The Final Recipe: Chocolate Chip Bear Cookies
Chocolate Chip Bear Cookies: How to Bake the Adorable Golden-Brown Classics
Equipment
- 1 Silver Metal Wire Cooling Rack Essential for airflow and achieving the visual aesthetic.
- 2 Baking Sheet Lined with parchment paper.
- 2 Mixing Bowls One for dry, one for wet ingredients.
Ingredients
Main Recipe
- 1 cup (227g) Unsalted Butter Softened to room temperature
- 1/2 cup (100g) Granulated Sugar
- 3/4 cup (150g) Light Brown Sugar Packed
- 1 large Egg Room temperature
- 2.5 cups (312g) All-Purpose Flour
- 1 tsp (5g) Baking Soda
- 1/2 tsp (3g) Sea Salt
- 1 cup (170g) Milk Chocolate Chips For body placement
- 1/2 cup (85g) Dark Chocolate Chips For eyes, nose, and ears
Instructions
Dough Preparation
- Cream the butter and sugars in a large bowl until light and fluffy. Beat in the egg and vanilla.
- Whisk flour, baking soda, and salt together, then gradually add to the wet ingredients until a soft dough forms.
Shaping and Baking
- For each cookie, roll one large ball (body), one medium ball (head), and six small balls (ears/limbs). Assemble on a baking sheet, pressing pieces together firmly.
- Press milk chocolate chips into the body. Use dark chocolate chips for the eyes, nose, and inside the ears.
- Chill the assembled bears for 30 minutes. Bake at 350°F (175°C) for 10-12 minutes until edges are golden but centers are pale.
Notes
Use a toothpick to adjust facial features immediately after removing from the oven.

Join the Baking Community!
We hope you enjoy crafting these Chocolate Chip Bear Cookies as much as we enjoyed designing them! They are the perfect blend of culinary art and classic flavor. If you make these at home, please leave a comment below and tell us how your bears turned out.
Don’t forget to follow us on Pinterest and share your photos! Pinning this recipe helps other home cooks find these adorable treats. Happy baking!
For more dessert inspiration, check out our latest guide on strawberry marshmallow frosting to top your next batch of cupcakes!


