There is a specific kind of nostalgia that only a classic Butter Mints Recipe can evoke. These tiny, velvety morsels are more than just candy; they are a sensory experience that defines celebrations, from vintage weddings to holiday gatherings. When you bite into one, it doesn’t just shatter; it dissolves into a cool, creamy cloud of peppermint and rich butter.
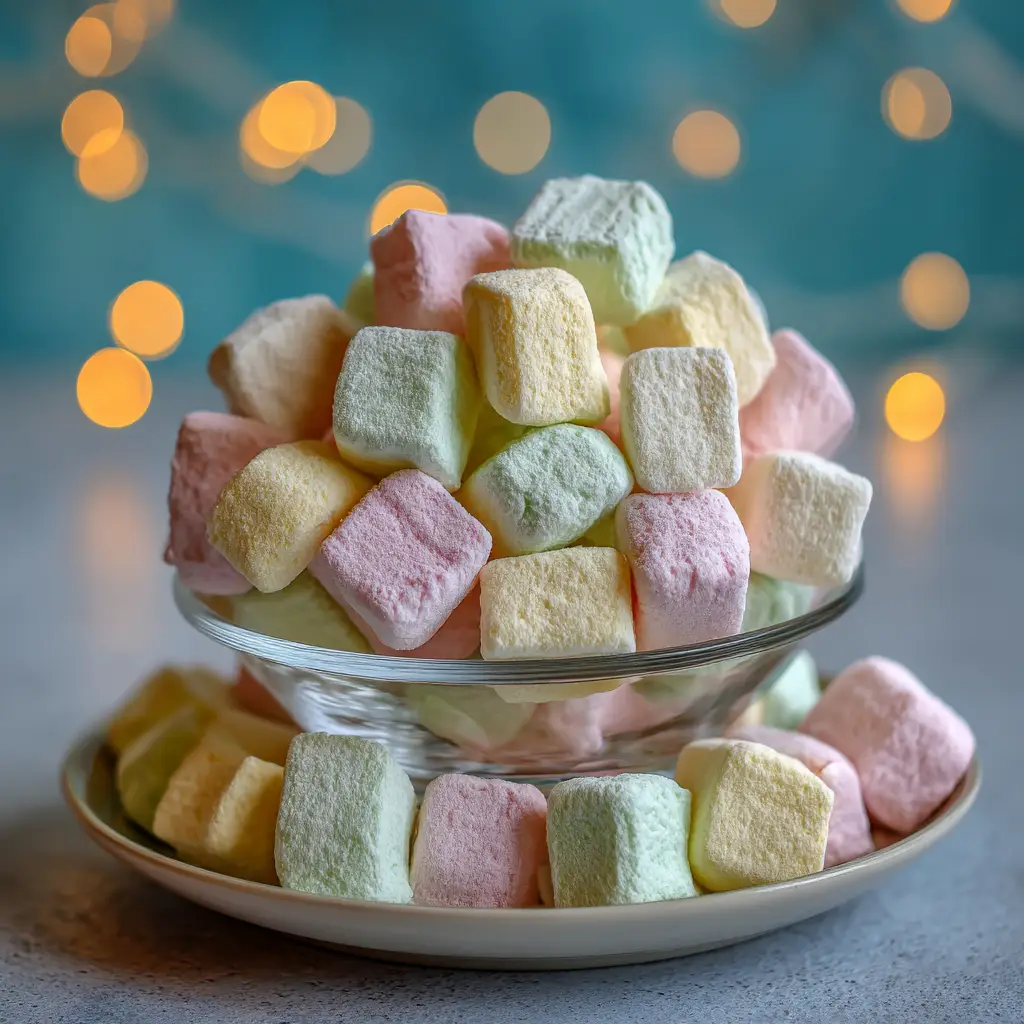
Achieving the perfect butter mint requires a delicate balance of high-quality fats and fine sugars. Our version focuses on creating that iconic matte, powdery texture that feels soft to the touch but maintains a sturdy, cube-like shape. We have designed this recipe to produce a beautiful trio of colors: pastel pink, pastel yellow-green, and a natural, creamy off-white.
Whether you are looking to fill a candy dish for a special event or simply want a sweet palate cleanser after a heavy meal, this guide will walk you through the culinary science of candy curing. You will learn how to manipulate simple pantry staples into professional-grade confections that look as though they stepped right out of a high-end boutique.
Why This Is the Only Butter Mints Recipe You Need
- The Perfect Texture: These mints feature a signature matte finish and a soft, powdery exterior that yields to a creamy, melt-away center.
- Visual Variety: Our instructions specifically include steps to create the classic pastel pink, yellow-green, and off-white palette seen in traditional confectionery displays.
- No-Bake Simplicity: This is a straightforward, heat-free process that relies on the “curing” method rather than complex candy thermometers.
- Versatile Flavor: While we prioritize pure peppermint, the base of this recipe is the perfect canvas for various extracts.
The Science of the Signature Melt-Away Sensation
The magic of a Butter Mints Recipe lies in the interaction between the lipids in the butter and the fine particles of the confectioners’ sugar. Unlike hard candies which rely on sugar glass structures, butter mints are a form of un-cooked fondant. The butter acts as an interfering agent, preventing the sugar from forming large, crunchy crystals.
When you use room temperature butter, it emulsifies more effectively with the heavy cream. This creates a smooth “dough” that can be rolled and cut without sticking. The “matte” look described in our visual blueprint is achieved through a 24-hour air-drying process, which allows the outer layer to slightly dehydrate while the inside remains moist.
If you enjoy the creamy profile of these mints, you might also find the rich textures in our coconut ricotta cake particularly satisfying. Both recipes rely on high-quality dairy to provide a luxurious mouthfeel that lingers on the palate.
Foundational Ingredients for Professional Results
Unsalted Butter (1/2 cup / 113g): Softened to room temperature, this provides the fat content necessary for the “melt” and carries the peppermint flavor throughout the candy. Using unsalted butter allows you to control the exact sodium level of your confections.
Confectioners’ Sugar (4 cups / 480g): This finely ground sugar provides the structure of the mint. It must be sifted to ensure there are no lumps, resulting in that perfectly smooth, matte texture seen in the bowl.
Heavy Cream (2 tbsp / 30ml): A small amount of moisture is needed to bind the sugar and butter. Heavy cream adds a layer of richness that water or milk simply cannot replicate.
Peppermint Extract (1 tsp / 5ml): This is the soul of the Butter Mints Recipe. We recommend a high-quality pure extract for a clean, bracing flavor that contrasts beautifully with the heavy butter.
Fine Sea Salt (1/4 tsp / 1.5g): Salt is the invisible hero here, cutting through the intense sweetness of the powdered sugar and highlighting the floral notes of the mint.
Gel Food Coloring: To achieve the specific pastel pink and pastel yellow-green hues, gel colors are superior to liquid ones as they do not alter the moisture balance of the dough.
Essential Equipment for Cube-Shaped Mints
To achieve the small, cube-shaped butter mints with slightly rounded edges, you will need a few specific tools. A stand mixer with a paddle attachment is ideal for thoroughly incorporating the heavy sugar into the butter without aerating it too much.
A bench scraper or a very sharp non-serrated knife is essential for making clean, vertical cuts. You will also need several large baking sheets lined with parchment paper to provide a non-stick surface where the mints can cure undisturbed for 24 hours.
For those who love working with decorative sweets, mastering this technique is a great precursor to making more complex toppings, like the ones used in our strawberry marshmallow frosting. The precision required for candy making translates perfectly to high-end cake decorating.
Phase 1: Creating the Peppermint Foundation
Creaming and Emulsifying
In the bowl of your stand mixer, combine the softened 1/2 cup (113g) of butter and the 1/4 tsp (1.5g) of salt. Beat on medium speed until the butter is completely smooth and slightly pale. This ensures the fat is ready to accept the sugar without forming clumps.
Slowly add 1 cup (120g) of the sifted confectioners’ sugar along with the 1 tsp (5ml) of peppermint extract and 2 tbsp (30ml) of heavy cream. Turn the mixer to low and blend until the liquid is fully incorporated into the butter. The mixture should look like a thick, glossy frosting at this stage.
Building the Dough Structure
Add the remaining 3 cups (360g) of powdered sugar one cup at a time. The mixture will eventually become too thick for the paddle; at this point, you can turn the dough onto a surface dusted with powdered sugar and knead it by hand.
Knead until the dough feels like smooth play-dough—it should be soft, pliable, and not sticky to the touch. If the dough feels too dry or crumbles, add heavy cream 1/2 teaspoon at a time. If it’s too sticky, add a tablespoon of sugar.

Phase 2: Color Customization and Shaping
Dividing for the Pastel Palette
Divide your dough into three equal portions. Leave the first portion as is; this will become your “creamy off-white” mints. The natural color of the butter and cream provides a beautiful, soft ivory tone that anchors the pastel colors.
Take the second portion and add a tiny drop of pink gel coloring. Knead the dough until the color is perfectly uniform. Repeat this with the third portion using a “leaf green” or “mint green” gel, adding just enough to reach a soft, pastel yellow-green shade.
Rolling and Cutting the Cubes
Roll each color of dough into long, thin ropes about 1/2 inch (1.25cm) in diameter. For the best visual result, try to keep the thickness consistent across all colors. This ensures that when they are piled into a bowl, the cubes look uniform.
Using a bench scraper or knife, cut the ropes into 1/2 inch (1.25cm) pieces. As you cut, the edges will naturally round out slightly, giving them that handcrafted, artisanal look. Arrange the cubes on your parchment-lined sheets so they are not touching.
The Crucial Curing Process for Matte Texture
This is the most important step in the Butter Mints Recipe. Do not store the mints immediately. They must sit out at room temperature for at least 24 hours, or up to 48 hours in humid climates. This air-drying creates the matte, powdery texture and the slight “shell” that makes them easy to handle.
You will know they are ready when the exterior feels firm and dry to the touch, but the center still gives slightly when pressed. The daylight hitting the mints in the bowl highlights this velvety surface, which is a hallmark of a properly cured butter mint.
Expert Tips for Confectionery Success
- Sift Your Sugar: Never skip sifting. Even tiny lumps of sugar will be visible in the final matte finish of the mints.
- Use Gel, Not Liquid: Liquid food coloring can make the dough too sticky to roll. Gel gives you vibrant or pastel colors with just a tiny amount of product.
- Control the Humidity: If you are making these on a rainy day, they may take longer to cure. Use a fan or a dehumidifier in the room if necessary.
- The “Rope” Technique: If the dough cracks when rolling into ropes, it needs more moisture. Knead in a few drops of heavy cream.
How to Store Your Butter Mints
Once the curing process is complete, store the mints in an airtight container at room temperature for up to 2 weeks. For longer storage, they can be kept in the refrigerator for a month or frozen for up to 3 months. If freezing, let them come to room temperature before opening the container to prevent condensation from ruining the matte finish.
These mints make excellent gifts. Simply place them in small glass jars or cellophane bags tied with a ribbon. Because they are sturdy, they travel well, making them a great addition to a dessert spread alongside healthy banana oat cookies.
Creative Pairings and Serving Suggestions
While these mints are often served alone, they pair beautifully with other items on a dessert table. Their cool peppermint flavor is a natural companion to rich chocolate dishes or fruity snacks. For a full “after-dinner” experience, serve them alongside a warm plate of pizza sliders or a comforting bowl of creamy garlic chicken ramen.
To recreate the look in our visual prompt, overfill a small, clear glass bowl with a mix of the three colors. Place the bowl on a neutral plate and set it in a spot with soft, natural daylight. The contrast between the pastel cubes and the glowing background creates a stunning presentation for guests.
Frequently Asked Questions
Yes, but peppermint oil is much stronger. Use only 1/4 to 1/2 teaspoon of oil for every 1 teaspoon of extract called for in the recipe.
No, they are shelf-stable at room temperature for about two weeks once they have cured. However, refrigeration can extend their life to a month.
The edges naturally round out slightly as you cut through the soft dough with a bench scraper or knife. You can also gently roll the individual cubes between your fingers for a more uniform look.
High humidity is usually the culprit. If your home is humid, the mints may need up to 48 hours to fully cure. You can also try adding a bit more powdered sugar to the dough next time.
The dough likely didn’t have enough moisture. Add a few more drops of heavy cream and re-knead the dough until it is smooth and pliable like clay before rolling.
The Ultimate Homemade Butter Mints Recipe
Butter Mints Recipe: The Ultimate Creamy Melt-in-Your-Mouth Candy
Equipment
- 1 Stand Mixer With paddle attachment
- 1 Bench Scraper Or sharp knife for cutting cubes
- 2 Baking Sheets Lined with parchment paper
Ingredients
Ingredients
- 1/2 cup Unsalted Butter Softened to room temperature (113g)
- 4 cups Confectioners' Sugar Sifted (480g)
- 2 tbsp Heavy Cream (30ml)
- 1 tsp Peppermint Extract Pure extract for best flavor (5ml)
- 1/4 tsp Fine Sea Salt (1.5g)
- Gel Food Coloring Pink and Green shades
Instructions
Prepare the Dough
- In a stand mixer, beat softened butter and salt until smooth and creamy.
- Mix in peppermint extract, heavy cream, and 1 cup of powdered sugar until combined.
- Gradually add the remaining powdered sugar until a stiff dough forms. Knead by hand until smooth and play-dough consistency.
Color and Shape
- Divide dough into three parts. Leave one white, tint one pastel pink, and one pastel yellow-green using gel coloring.
- Roll each portion into 1/2-inch thick ropes on a surface dusted with powdered sugar.
- Cut ropes into 1/2-inch cubes using a bench scraper and place on parchment-lined trays.
Cure
- Let mints sit uncovered at room temperature for 24-48 hours until they develop a matte, powdery exterior.
Notes
For a stronger 'cooling' sensation, you can use 1/2 tsp of peppermint oil instead of extract, but reduce the amount as oil is much more potent.
Share the Sweetness!
Making your own candies is a rewarding culinary skill that brings joy to everyone who tries them. This Butter Mints Recipe is a testament to how simple ingredients, when treated with care and the right technique, can create something truly elegant. If you enjoyed this recipe, please leave a comment below and share your photos with us!
Don’t forget to follow us on Pinterest for more sweet inspiration and confectionery tips. Happy candy making!


