When you crave a decadent dessert but your pantry is looking thin, these 3 ingredient banana brownies are the absolute gold standard for effortless baking. Combining the natural sweetness of overripe fruit with the deep complexity of dark cocoa, this recipe transforms basic staples into a gourmet experience.
The visual appeal of these brownies is undeniable, featuring a dense, extremely fudgy crumb and a signature matte, slightly crinkly top that rivals any high-end bakery. By mastering a few simple techniques, you can achieve that perfectly square, dark chocolate-brown stack seen in professional food photography right in your own kitchen.
Whether you are looking for a healthier alternative to traditional treats or simply need a quick win for your next gathering, these brownies deliver on every promise. Let’s dive into the science of how three humble ingredients create such a sophisticated texture.
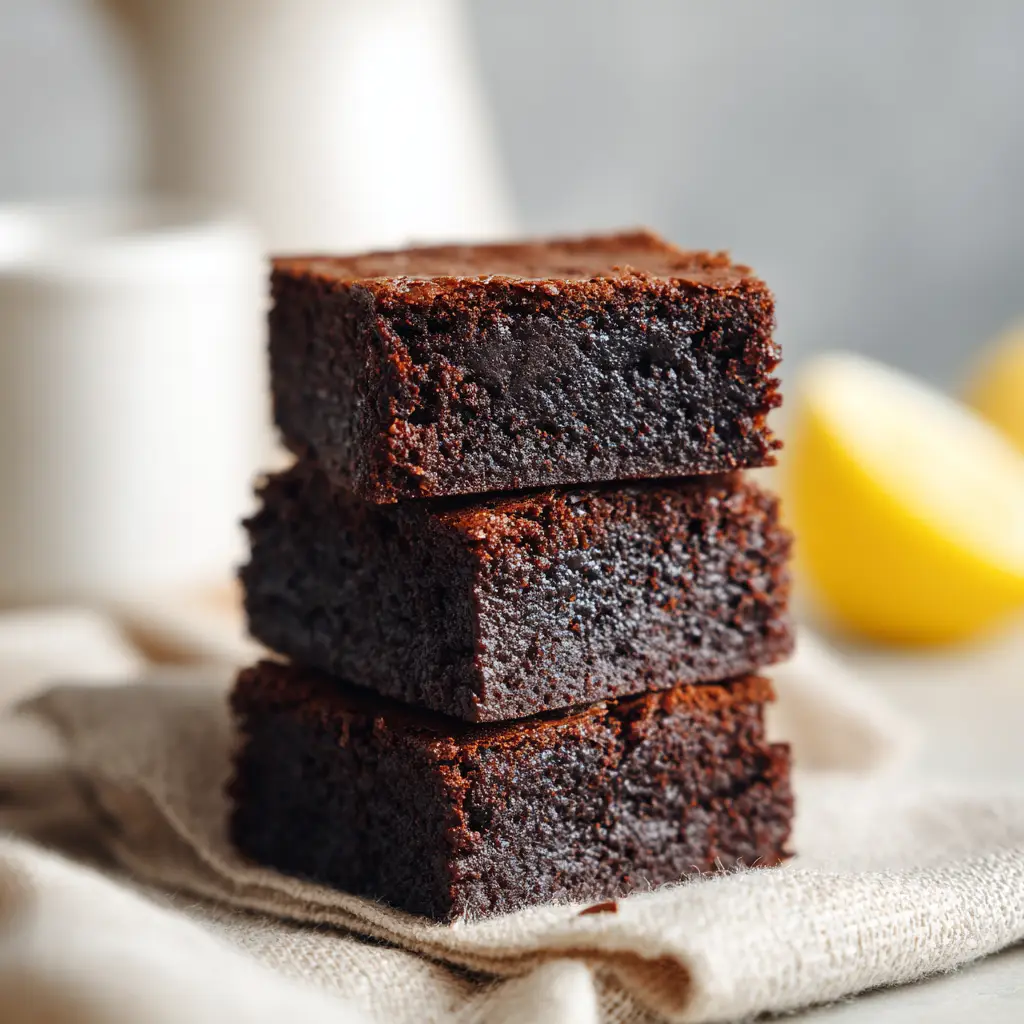
Why These Fudgy Banana Brownies Are a Game Changer
- Extremely Fudgy Texture: Unlike cakey brownies, this version focuses on a moisture-rich, dense crumb that melts in your mouth.
- Naturally Sweetened: By utilizing the sugars in overripe bananas, we eliminate the need for refined white sugar while maintaining a deep sweetness.
- Perfectly Crinkly Top: We use specific mixing methods to ensure the surface achieves that professional, matte, crinkled look.
- Dietary Friendly: Naturally gluten-free, dairy-free, and vegan-friendly, making them perfect for diverse crowds.
- Visual Precision: Designed to hold their shape, allowing you to cut those “perfectly square” edges for a stunning presentation.
The Anatomy of Three Essential Ingredients
To achieve the dark chocolate-brown result and the moist crumb described in our visual blueprint, each ingredient must be selected and prepared with forensic precision. While the list is short, the quality of these components dictates the final structural integrity of your bake.
1. Overripe “Spotted” Bananas
You need 1.5 cups (350g) of mashed bananas, which usually equates to three medium fruits. The bananas must be heavily spotted or nearly black to ensure they provide enough liquid and natural sugar to bind the cocoa without adding flour.
2. Creamy Almond or Cashew Butter
Use 1/2 cup (125g) of a smooth, drippy nut butter to act as the primary fat source and structural stabilizer. Cashew butter yields a more neutral “brownie” flavor, while almond butter adds a slight nuttiness that complements the dark chocolate notes.
3. High-Quality Unsweetened Cocoa Powder
Incorporate 1/2 cup (45g) of Dutch-processed cocoa powder for that characteristic dark chocolate-brown hue and a smoother, less acidic flavor profile. This ingredient provides the “bulk” of the brownie, acting as the flour substitute to create a dense crumb.
Foundational Invisible Ingredients: To elevate the chemical reaction and flavor, we also include 1/4 tsp (1.5g) of fine sea salt and 1/2 tsp (2.5ml) of pure vanilla extract. These aren’t considered “main” ingredients but are scientifically necessary to balance the tannins in the cocoa and the sweetness of the fruit.
Essential Equipment for Professional Results
To achieve the “perfectly square” look of a professional vertical stack, the right tools are non-negotiable. You aren’t just baking; you are engineering a texture that needs to be both soft and structurally sound.
An 8×8-inch (20x20cm) square baking pan is the ideal vessel for this volume of batter, providing the perfect thickness for a fudgy interior. You must also use high-quality parchment paper to line the pan, allowing you to lift the entire block out for clean slicing once cooled.
A fine-mesh sieve is critical for sifting the cocoa powder, as any clumps will result in dry pockets rather than a cohesive, moist crumb. Finally, a sharp chef’s knife—cleaned between every single cut—is the secret to those sharp, geometric edges seen in our smartphone-style photo prompt.

How to Make 3 Ingredient Banana Brownies Step-by-Step
Phase 1: Preparing the Banana Base
Preheat your oven to 350°F (175°C) and line your square pan with parchment paper, leaving an overhang on the sides. In a large mixing bowl, mash your overripe bananas until they reach a completely liquid consistency with no visible lumps.
Visual Cue: The bananas should look like a thick, pale yellow syrup. If you see chunks, keep mashing; lumps will ruin the “extremely fudgy” texture we are aiming for.
Phase 2: Emulsifying the Fats and Flavors
Whisk in the creamy nut butter, vanilla, and salt until the mixture is glossy and fully combined. This step is where you build the “heaviness” of the brownie, ensuring the fat is evenly distributed to create that matte, crinkly top during the bake.
If you enjoy experimenting with similar textures, you might find our techniques for coconut ricotta cake helpful for understanding moisture balance in flourless baking.
Phase 3: Sifting and Folding the Dark Cocoa
Sift the cocoa powder directly over the wet ingredients. Use a silicone spatula to gently fold the cocoa into the banana mixture until no dry streaks remain. Do not overmix, as this can introduce too much air, leading to a cakey texture instead of the desired dense crumb.
The batter will be thick, dark, and incredibly fragrant. This is the stage where the “dark chocolate-brown” color is locked in.
Phase 4: The Precision Bake
Spread the batter into your prepared pan, smoothing the top with an offset spatula. Bake for 20-25 minutes. The key sensory cue to look for is the surface: it should transition from shiny to a “slightly crinkly, matte top” while the edges just begin to pull away from the parchment.
Do not overbake! A toothpick inserted into the center should come out with a few moist crumbs attached—this ensures the “moist crumb texture” is preserved.
Expert Tips for the Most Fudgy Results
- The 2-Hour Cooling Rule: To achieve “perfectly square” cuts, you MUST let these brownies cool completely in the pan, then chill in the fridge for at least 2 hours before slicing. This sets the fats and creates the signature fudgy bite.
- Banana Ripeness: If your bananas aren’t spotted enough, roast them in their skins at 300°F (150°C) for 15 minutes until black. This caramelizes the sugars and softens the fruit instantly.
- Cocoa Matters: Use “Extra Dark” or Dutch-process cocoa for that intense visual contrast against the light beige linen napkin background.
- Avoid the Center: When cutting, trim the very outer edges off first. This allows you to serve only the center pieces which have the most consistent “moist crumb.”
Smart Storage and Make-Ahead Instructions
Because these 3 ingredient banana brownies are so moisture-dense, they actually improve in texture after a day in the refrigerator. Store them in an airtight container with layers separated by parchment paper to prevent sticking.
In the fridge, they will stay fudgy and delicious for up to 5 days. If you want to prep these for a long-term snack, they freeze beautifully. Wrap individual squares in plastic wrap and store them in a freezer bag for up to 3 months. Thaw them at room temperature for 20 minutes for a texture that mimics a rich chocolate truffle.
What to Serve With Your Flourless Brownies
These brownies are a fantastic “hero” dessert, but they also pair well with other wholesome snacks. If you are on a healthy baking streak, consider serving these alongside our healthy banana oat cookies for a banana-themed dessert board.
For a more indulgent pairing, a dollop of whipped cream or a side of creamy lemon custard cake provides a bright, acidic contrast to the deep, dark chocolate notes of the brownies. If you’re looking for a savory counterpoint to prep for the week, these brownies are the perfect follow-up to our make-ahead egg muffins.
Frequently Asked Questions
While flourless, bananas are high in natural sugars and carbs, so these are not typically considered keto. They are, however, a great option for paleo or clean-eating diets.
Absolutely! While it becomes a 4-ingredient recipe, folding in 1/2 cup of dark chocolate chips will enhance the fudginess and add a nice texture contrast.
Yes, peanut butter works perfectly, though it will add a stronger ‘peanut’ flavor to the brownies. For the most neutral dark chocolate taste, cashew butter is recommended.
The ‘crinkle’ comes from the emulsification of the fats in the nut butter with the sugars in the banana. Ensure you whisk the nut butter and banana thoroughly before adding the cocoa powder.
This usually happens if the bananas weren’t mashed well enough or if the brownies weren’t allowed to cool completely. These brownies set as they cool; refrigeration for 2 hours is essential for the fudgy texture.
The 3 Ingredient Banana Brownies Recipe Card
3 Ingredient Banana Brownies: The Ultimate Fudgy Flourless Masterpiece
Equipment
- 1 8x8 inch Square Baking Pan Lined with parchment paper
- 1 Fine-Mesh Sieve For sifting cocoa powder
Ingredients
Brownie Batter
- 1.5 cups Overripe Bananas approx 350g or 3 medium bananas, mashed smooth
- 1/2 cup Almond or Cashew Butter 125g, creamy and well-stirred
- 1/2 cup Unsweetened Cocoa Powder 45g, Dutch-processed preferred
- 1/4 tsp Sea Salt 1.5g, foundational for flavor
- 1/2 tsp Vanilla Extract 2.5ml, for aroma
Instructions
Preparation
- Preheat your oven to 350°F (175°C) and line an 8x8-inch pan with parchment paper.
- In a large bowl, mash the overripe bananas until they are liquid and completely lump-free.
Mixing and Baking
- Whisk in the nut butter, vanilla, and salt until the mixture is smooth and glossy.
- Sift the cocoa powder into the bowl and fold gently with a spatula until no dry streaks remain.
- Pour into the pan and bake for 20-25 minutes until the top is matte and slightly crinkly.
Finishing
- Allow to cool completely in the pan for 2 hours before slicing into 9 perfect squares.
Notes
Chill the brownies before slicing to get those professional sharp edges.
Join the Spiced Bites Community!
These 3 ingredient banana brownies prove that you don’t need a complicated pantry to create a five-star dessert. The combination of dense fudginess and clean, square lines makes them a staple for any home cook looking to impress with minimal effort.
If you enjoyed this recipe, please leave a comment below and let us know how your crinkly tops turned out! Don’t forget to follow us on Pinterest and share your bakes with the community. Happy baking!


